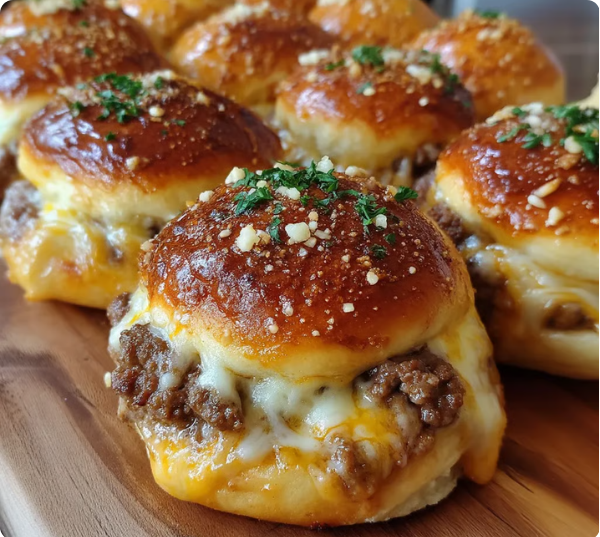
Garlic Parmesan Cheeseburger Bombs are the ultimate handheld comfort food, combining juicy seasoned beef, melty cheese, and a golden garlic-butter crust inside a buttery biscuit dough wrapper. Perfect for game day, parties, or casual weeknight dinners, these bite-sized bombs deliver all the flavors of your favorite burger in a portable, irresistible package.
When I first made these bombs, I was hosting a small family gathering and wanted something fun yet satisfying. Within 30 minutes, the kitchen filled with the aroma of garlic and buttery biscuits, and the first bites were met with audible “wow”s. The beef was perfectly seasoned, cheese melted luxuriously, and the garlic-parmesan crust added the perfect finishing touch. They quickly became the star of the night, disappearing faster than I could plate them.
Ingredients
Equipment
Method
- Brown the ground beef in a skillet over medium-high heat until no pink remains. Drain excess fat.
- Return beef to skillet, add Worcestershire sauce, salt, pepper, garlic powder, and onion powder. Mix well and let cool 5 minutes.
- Stir in shredded cheddar cheese and optional mix-ins. Let rest 1 minute.
- Flatten biscuit dough rounds to 3 inches, place 1–2 tbsp filling in center, pinch edges to seal, and roll into balls.
- Preheat oven to 375°F. Place bombs seam-side down on parchment-lined baking sheet, spaced 2 inches apart.
- Brush tops with garlic butter and sprinkle with Parmesan.
- Bake 15–18 minutes until golden brown. Let cool 3–5 minutes.
- Garnish with parsley and serve warm with your favorite dipping sauce.
Nutrition
Notes
Tried this recipe?
Let us know how it was!Preparing the Beef Filling
Browning the Ground Beef
Start by cooking 1 pound of ground beef in a large skillet over medium-high heat. Break it into small pieces as it browns, cooking 5–7 minutes until no pink remains. Drain any excess fat to keep the filling from being greasy.
Seasoning for Maximum Flavor
Return the beef to the skillet and stir in 1 teaspoon Worcestershire sauce, ½ teaspoon salt, ½ teaspoon black pepper, ½ teaspoon garlic powder, and ½ teaspoon onion powder. Mix well until fragrant and fully combined. Let the mixture cool slightly—about 5 minutes—before adding cheese to prevent premature melting.
Adding Cheese and Optional Fillings
Incorporating Cheese
Stir in 1 cup of shredded cheddar cheese until evenly distributed. The cheese should form clumps that create a gooey, melty texture in every bite.
Optional Mix-Ins
At this stage, gently fold in any optional add-ins such as 2 tablespoons finely chopped pickles or bacon crumbles. Let the mixture rest another minute to firm up slightly before assembling the bombs. This ensures the filling stays contained during baking.
Assembling the Cheeseburger Bombs
Shaping the Bombs
Separate the biscuit dough into individual rounds and flatten each to about 3 inches in diameter. Place 1–2 tablespoons of the beef-cheese mixture in the center of each round. Pinch the edges together firmly to seal and roll into a smooth ball. Proper sealing prevents leaks and ensures even baking.
Arranging for Baking
Preheat your oven to 375°F (190°C). Place each bomb seam-side down on a parchment-lined baking sheet, spacing them about 2 inches apart. This spacing allows even baking and prevents sticking.
Garlic Butter and Baking Perfection
Brushing with Garlic Butter
Combine 2 tablespoons melted butter with 1 minced garlic clove (or ½ teaspoon garlic powder). Brush the mixture generously over the tops of the bombs. Sprinkle ¼ cup grated Parmesan over each one for a savory, nutty finish.
Baking and Serving
Bake for 15–18 minutes, or until golden brown and hollow-sounding when tapped. Let cool 3–5 minutes to allow the filling to set slightly. Garnish with fresh parsley if desired, and serve warm. These bombs pair wonderfully with ketchup, ranch, or your favorite dipping sauce.
Tips, Storage, and Serving Suggestions
Tips for Success
- Use cold hands when handling the filling to prevent sticking.
- Seal seams tightly to avoid leaks.
- Use freshly shredded cheese for optimal meltability.
- Assemble unbaked bombs ahead of time and refrigerate or freeze for later use.
Storage and Reheating
Store baked bombs in an airtight container in the fridge for up to 2 days. Reheat in the oven at 350°F for 5–7 minutes. For make-ahead meals, freeze unbaked bombs and bake directly from frozen, adding a few extra minutes to cook time.
Serving Suggestions
Serve as an appetizer, snack, or mini meal with sides like coleslaw, potato salad, or fresh veggies. Perfect for pairing with beer, soda, or sparkling water for game day or parties.
FAQ
1. Can I use mozzarella instead of cheddar?
Yes, mozzarella will give a stretchy, melty texture, while cheddar offers sharper flavor.
2. Can these be made ahead?
Yes, assemble unbaked bombs and refrigerate overnight or freeze for later baking.
3. How do I prevent cheese from leaking?
Allow the filling to cool slightly before adding cheese and seal the biscuit dough seams tightly.
4. Can I add other mix-ins?
Absolutely! Bacon crumbles, pickles, or sautéed onions work beautifully.
5. Can I make these gluten-free?
Use your favorite gluten-free biscuit dough, and all other ingredients remain the same.
Conclusion
Garlic Parmesan Cheeseburger Bombs are a fun, flavorful way to enjoy all the classic burger flavors in one handheld bite. With a crispy garlic-butter crust, juicy beef center, and gooey cheese, they are perfect for game day, parties, or weeknight dinners. Mastering these bombs means mastering a crowd-pleasing snack that’s ready in under 30 minutes and guaranteed to delight everyone.


Leave a Reply