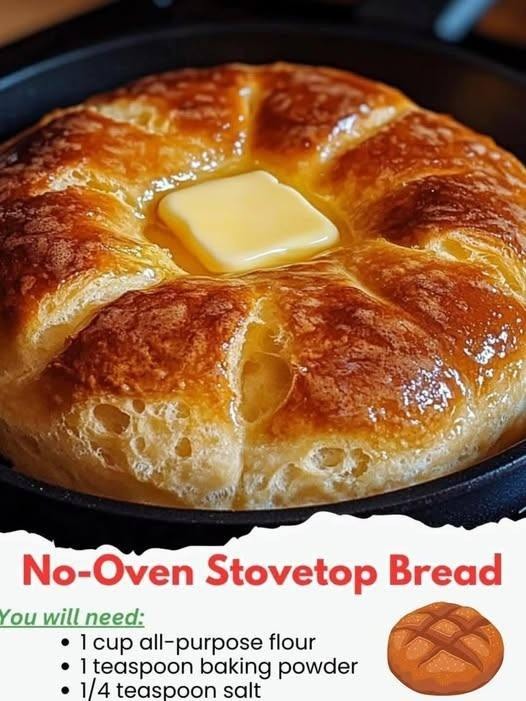
First, let me just say how grateful I am that you’re here — truly! Every time I see a new comment, a shared photo, or an email about one of my recipes, my heart does a happy dance. Bread-making has always felt like a little bit of kitchen magic to me — flour, water, yeast, and patience turning into something soft, fragrant, and utterly comforting. And this no-oven stovetop bread is proof that you don’t need fancy equipment (or even an oven!) to bake up something beautiful.
If you’ve ever felt discouraged because your kitchen gets too hot in the summer or you simply don’t have an oven, this recipe is for you. It’s a love letter to resourceful home bakers everywhere — the ones who make magic happen with what they’ve got.
👉 Want the recipe sent straight to your inbox? Subscribe below and never miss a cozy, carb-filled moment!
Why You’ll Love This No-Oven Bread
This bread is the definition of comfort meets convenience. It’s everything you want in a homemade loaf — soft, fluffy, lightly golden — without the hassle of preheating or baking. Here’s why you’ll adore it:
- No oven required! Just a stove and a good skillet.
- Soft and fluffy inside, golden on the outside.
- Quick rise. You don’t need to wait all day for it to puff up.
- Versatile. Perfect with soups, stews, curries, or just a smear of butter and jam.
- Beginner-friendly. Foolproof, forgiving, and satisfying every single time.
What Does This Stovetop Bread Taste Like?
Imagine the tenderness of a dinner roll mixed with the light chew of a flatbread. It’s got that slightly crisp edge, a pillowy center, and a neutral, buttery flavor that goes with absolutely everything. Whether you pair it with a hearty stew or drizzle it with honey, it’s anything but boring!
Benefits of This Recipe
- Saves energy — no oven heating up your kitchen.
- Works beautifully in small spaces like dorms, RVs, or tiny apartments.
- Flexible — you can mix in whole wheat, herbs, or seeds.
- Keeps its softness even the next day!
Ingredients You’ll Need
- 2 ½ cups (300g) all-purpose flour
- 1 tsp salt
- 1 tbsp sugar
- 1 tbsp instant yeast
- 2 tbsp olive oil (plus more for greasing)
- ¾ cup (180ml) warm water (adjust as needed)
Tools You’ll Need
- Large mixing bowl
- Wooden spoon or spatula
- Rolling pin (or a clean wine bottle in a pinch!)
- Large non-stick skillet with lid (cast iron works beautifully)
- Clean kitchen towel for proofing
Ingredient Swaps & Add-Ins
- Flour: Swap half the white flour for whole wheat for a heartier flavor.
- Oil: Use melted butter or ghee for extra richness.
- Add-ins: Try garlic powder, fresh herbs, sesame seeds, or even shredded cheese mixed right into the dough.
How to Make No-Oven Stovetop Bread
- Activate the yeast (optional if using instant): If you prefer, dissolve the yeast and sugar in warm water and let it sit for 5–10 minutes until bubbly.
- Mix the dough: In a large bowl, combine flour and salt. Add yeast, olive oil, and warm water gradually until a soft dough forms.
- Knead: Turn onto a floured surface and knead for 6–8 minutes until smooth and elastic.
- First rise: Place in a lightly oiled bowl, cover with a towel, and let rise for about 45 minutes or until doubled in size.
- Shape: Punch down the dough and divide it into 4–6 equal portions. Roll each one into a ball, then flatten gently into rounds about ½ inch thick.
- Preheat the skillet: Heat your non-stick or cast-iron skillet over low-medium heat and brush lightly with oil.
- Cook: Place 1–2 dough rounds in the pan. Cover with a lid and cook for 2–3 minutes per side, until puffed and golden brown.
- Cool: Remove and wrap in a clean towel to keep warm and soft. Repeat with remaining dough.
What to Serve with This Bread
This stovetop bread goes with everything! Try it with:
- Butter and homemade jam for breakfast
- Curries, soups, or stews for dinner
- Olive oil and balsamic vinegar for dipping
- Topped with avocado or hummus for a light lunch
Tips for Success
- Keep the heat low to medium — too hot and the bread will brown before cooking through.
- Covering the skillet helps create steam, making the bread soft and fluffy.
- Don’t skip the resting time; it gives the yeast time to work its magic.
Storage Instructions
Let the bread cool completely before storing.
- Room temperature: Store in an airtight container for up to 2 days.
- Freezer: Wrap tightly in plastic wrap, then in a freezer bag for up to 1 month. Reheat in a warm skillet or microwave for 20 seconds.
Frequently Asked Questions
Can I use active dry yeast instead of instant?
Yes! Just proof it in warm water with sugar for 10 minutes before adding to the flour.
Can I make this gluten-free?
You can use a 1:1 gluten-free baking flour blend, though texture will be slightly different.
Can I bake this instead of cooking on the stove?
Absolutely! Bake at 375°F (190°C) for 15–20 minutes until golden.
How do I make it more flavorful?
Add garlic butter, fresh herbs, or brush with melted butter after cooking.
General Information
- Prep Time: 10 minutes
- Cook Time: 15 minutes
- Rise Time: 45 minutes
- Total Time: 1 hour 10 minutes
- Servings: 6 rounds
Nutritional Information (per piece)
- Calories: ~180
- Carbohydrates: 28g
- Protein: 4g
- Fat: 5g
- Fiber: 1g
- Sugar: 1g


Leave a Reply