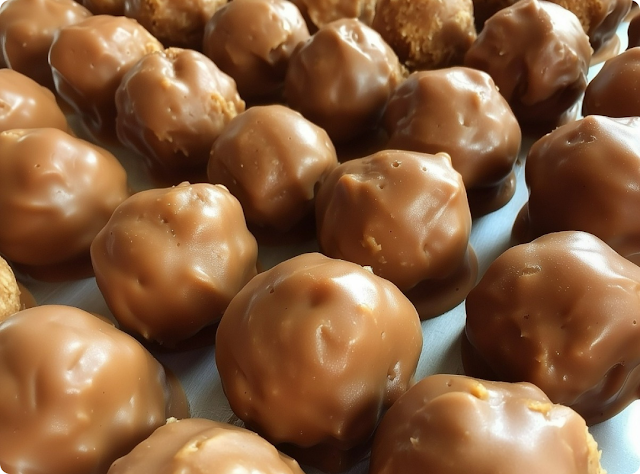
Butterfinger Balls are everything you love about the classic candy bar—crispy, peanut-buttery, and chocolate-coated—transformed into rich, poppable bites that are even better homemade. Crunchy Butterfinger pieces melt into creamy peanut butter, get lightly sweetened and bound, then dipped in glossy chocolate that sets with the perfect snap. They’re indulgent, nostalgic, and shockingly easy to make.
This Butterfinger Balls recipe is built for real life. No oven. No candy thermometer. No complicated steps. Just five familiar ingredients and about 30 minutes from start to finish. The result is a dessert that feels special enough for gifting but simple enough for a weekday craving.
I started making these when I needed a fast, reliable treat that didn’t require baking or planning ahead. They were meant for sharing, but they disappeared faster than expected. Since then, they’ve earned a permanent spot in my no-bake rotation—especially during the holidays and anytime chocolate cravings hit hard.
Ingredients
Equipment
Method
- Crush Butterfinger bars into small pieces.
- Mix crushed candy, peanut butter, and powdered sugar until combined.
- Roll mixture into 1-inch balls and place on lined baking sheet.
- Chill balls for 15–20 minutes until firm.
- Melt chocolate and dip chilled balls. Let set.
Nutrition
Notes
Tried this recipe?
Let us know how it was!Why Butterfinger Balls Are So Addictive
Classic flavor, upgraded texture
Butterfinger Balls work because they amplify what makes the candy bar great. Crushing the Butterfinger bars creates tiny shards that spread crunch throughout every bite. Peanut butter adds richness and depth, while the chocolate coating brings balance and structure.
The result is more peanut-forward and less cloying than the original bar.
No-bake simplicity that delivers
This recipe skips all the usual stress points. There’s no baking, no exact temperatures, and no risk of failure. If you can stir, scoop, and dip, you can make these.
That ease makes them perfect for beginners, kids, or busy days.
The 5 Ingredients That Make It Happen
Butterfinger candy bars
Crushed Butterfinger bars provide the signature crunch and caramelized peanut flavor. Crushing them finely helps the mixture hold together while still delivering texture.
This ingredient does the heavy lifting for flavor.
Peanut butter and powdered sugar
Peanut butter binds everything together and adds creaminess. Powdered sugar sweetens and firms the mixture just enough to roll into balls without becoming dry.
The balance keeps the centers soft, not crumbly.
Chocolate coating
Melted chocolate chips or melting wafers create a smooth outer shell that sets cleanly. This coating locks everything in and adds that satisfying snap when you bite in.
Using good-quality chocolate makes a noticeable difference.
How to Make Butterfinger Balls
Mixing the filling
Start by crushing the Butterfinger bars into small pieces. In a bowl, mix the crushed candy with peanut butter and powdered sugar until a thick, cohesive dough forms. The mixture should be soft but firm enough to roll.
If it feels too soft, chill briefly before shaping.
Rolling and chilling
Scoop the mixture and roll into 1-inch balls. Place them on a lined baking sheet and chill until firm. This step helps them hold their shape during dipping.
Chilling also makes dipping easier and cleaner.
Dipping in chocolate
Melt the chocolate gently until smooth. Dip each chilled ball, letting excess chocolate drip off, then return to the lined sheet. Allow the coating to set fully before serving or storing.
The finished balls should be glossy and smooth.
Variations and Fun Twists
Extra crunch
Add a tablespoon of crushed pretzels or rice cereal to the filling for added texture.
Flavor swaps
Use crunchy peanut butter for even more bite, or drizzle white chocolate over the dark coating for contrast.
Holiday-ready
Top freshly dipped balls with sprinkles, flaky salt, or extra crushed candy before the chocolate sets.
Serving and Storage Tips
How to serve them
Butterfinger Balls are perfect for holiday platters, bake sales, party favors, or casual snacking. Place them in mini cupcake liners for a polished look.
They pair beautifully with coffee, hot cocoa, or cold milk.
Make-ahead and storage
Store Butterfinger Balls in an airtight container in the refrigerator for up to one week. They also freeze well for longer storage. Let them sit at room temperature for a few minutes before serving for the best texture.
FAQ
Do I need a food processor?
No, crushing the candy in a bag works well.
Can I use natural peanut butter?
Yes, but make sure it’s well mixed and not too oily.
Will they melt at room temperature?
They hold well but are best kept cool.
Can I double the recipe?
Absolutely. It scales easily.
Are these kid-friendly?
Yes, with supervision during chocolate melting.
Conclusion
Butterfinger Balls are proof that the best desserts don’t have to be complicated. With five ingredients, no baking, and unbeatable flavor, they deliver pure, handheld joy in every bite. Once you make them, you’ll understand why they become an instant favorite—easy, nostalgic, and impossible to resist.


Leave a Reply