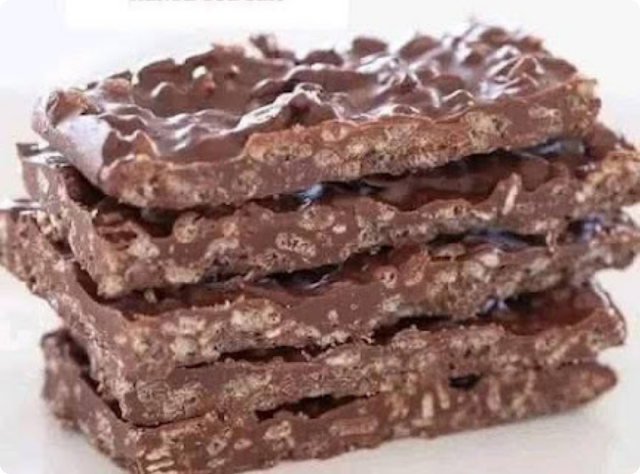
Easy Homemade Crunch Bars deliver everything people love about classic chocolate treats while keeping the process simple enough for even the busiest days. Because these bars rely on pantry ingredients and require no baking, they create instant joy with minimal effort. The rich chocolate coating, crisp cereal texture, and hint of salt make each bite balanced and deeply satisfying. Since Easy Homemade Crunch Bars store well and travel easily, they work for gifts, snacks, potlucks, and celebrations of every size.
When I first learned to make these bars, the recipe came from a neighbor who shared them at a small community gathering. She told me they were inspired by no-bake treats her family made during lean times, when creativity mattered more than fancy ingredients. I loved how something so simple could feel nostalgic and comforting. After making them at home, I added a touch of salt and adjusted the chocolate to deepen the flavor. Over time, this version became my go-to for holidays, bake sales, and moments when a little sweetness could turn a day around.
Ingredients
Equipment
Method
- Line an 8x8-inch pan with parchment paper.
- Melt chocolate and butter together until smooth.
- Stir in salt, then fold in cereal until evenly coated.
- Press mixture firmly into the pan.
- Chill for 1 hour or until firm.
- Lift out, slice into bars, and serve.
Nutrition
Notes
Tried this recipe?
Let us know how it was!Understanding the Core Ingredients
Why Simple Ingredients Make the Best Crunch Bars
Because this recipe uses only a few familiar ingredients, each one plays an important role. Melted chocolate forms the base, binding the cereal and creating a smooth, rich texture. Crispy rice cereal brings that signature light crunch. A bit of butter helps the chocolate stay glossy and prevents it from becoming too firm, which makes slicing easier. A small pinch of salt enhances the chocolate’s depth and rounds out the sweetness.
Using simple pantry staples keeps the recipe practical and approachable. Since everything melts and mixes easily, you don’t need special equipment or advanced skills. The combination stays true to old-fashioned no-bake bars, which were created to stretch ingredients yet still feel indulgent.
Choosing the Best Chocolate for Flavor
Chocolate is the heart of Easy Homemade Crunch Bars. Semi-sweet chocolate chips create a smooth, balanced flavor that appeals to most palates, while dark chocolate offers richer, deeper notes. Milk chocolate can be used if you prefer a sweeter bar. Because the chocolate provides structure, using higher-quality chips or chopped baking bars helps the bars set cleanly and slice without crumbling.
Adding a spoonful of peanut butter or coconut oil while melting the chocolate can create a softer, silkier texture. This is optional, but it makes the bars slightly more tender while keeping the crunch intact. No matter which variation you choose, smooth melted chocolate ensures the perfect coating for each cereal piece.
Preparing the Bars with Ease
Mixing Everything Together
Since this is a no-bake recipe, the process stays wonderfully simple. After melting chocolate with butter, stir in the cereal until each piece is coated. Working quickly keeps the mixture smooth and manageable. Because the cereal absorbs chocolate evenly, you get a consistent crunch in every bite.
Mixing by hand gives better control than using electric tools, helping avoid crushed cereal. A rubber spatula works best for folding everything together. The mixture should look glossy, thick, and studded with visible cereal pockets.
Pressing and Shaping the Pan
Once the mixture is ready, press it firmly into a parchment-lined pan. This step determines the final shape and thickness of the bars. A flat spatula or the back of a spoon helps create an even surface. Because the parchment lifts out easily, removing and slicing the bars becomes mess-free.
Chilling the mixture allows it to set fully. After about an hour in the refrigerator, the bars firm up into clean, stackable squares. This makes them ideal for gifting or packing in lunchboxes. The bars stay crisp without becoming hard, striking a balance that makes them easy to bite into.
Customizing Your Crunch Bars
Easy Flavor Variations
Although the classic version uses just chocolate and cereal, adding small mix-ins can create fun new variations. Mini marshmallows add chewiness, while crushed pretzels contribute a salty crunch. Peanuts or almonds give extra richness, and a swirl of peanut butter creates a familiar, comforting twist.
For a festive touch, add sprinkles or drizzle melted white chocolate over the top before chilling. Toasted coconut flakes mix especially well with dark chocolate. Because this recipe is flexible, you can adapt it for any season, holiday, or gathering.
Adjusting Texture to Your Taste
If you prefer softer bars, increase the butter slightly or mix in a spoonful of peanut butter to create a tender finish. For firmer, crunchier bars, reduce the butter and allow the mixture to chill longer. Since cereal is the main source of texture, using fresh, crisp cereal makes a noticeable difference.
You can also change the thickness by using a smaller or larger pan. Thicker bars feel more substantial, while thinner bars make excellent bite-sized treats for parties. These simple choices give you full control over the final product.
Storing, Serving, and Sharing
Best Ways to Store Crunch Bars
Easy Homemade Crunch Bars store beautifully. Once cut, place them in an airtight container with parchment between layers. They keep at room temperature for up to a week, or you can refrigerate them for up to two weeks. Freezing extends their life even further; they thaw quickly and maintain their crisp texture.
Because they stay stable outside the fridge, they’re perfect for bake sales, gift bags, or holiday tins. Their durability means they travel well and retain their shape even in warm rooms.
Perfect Occasions for Enjoying These Bars
These bars shine at potlucks, school events, and family gatherings because they appeal to kids and adults alike. They also make thoughtful homemade gifts since they package beautifully and require only simple wrapping. A small box lined with parchment and tied with twine turns them into a charming treat.
They also work well as after-school snacks or lunchbox additions. Since the recipe yields plenty of pieces, you can share generously while still saving a few squares for later.
FAQ
Can I use a different cereal?
Yes, any crisp cereal works, including cornflakes or puffed rice blends.
Do the bars need to stay refrigerated?
Not necessarily. They keep well at room temperature unless your kitchen is very warm.
Can I melt the chocolate in the microwave?
Yes, microwave in short intervals and stir often to avoid burning.
How do I make cleaner slices?
Use a sharp knife and allow the bars to sit at room temperature for a few minutes before cutting.
Can I double the recipe?
Yes, simply use a larger pan or make two separate batches.
Conclusion
Easy Homemade Crunch Bars combine nostalgia, simplicity, and satisfying texture in every bite. Because they require no baking and only a handful of ingredients, they deliver impressive results with minimal effort. Whether you’re preparing a quick dessert, stocking the freezer, or sharing homemade gifts, this reliable recipe brings joy to any occasion.


Leave a Reply