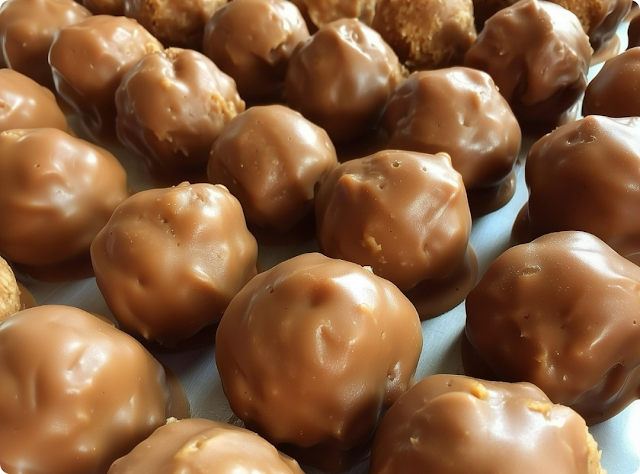
Butterfinger Balls: Your New 5-Ingredient, No-Bake Obsession! delivers a perfect mix of crunch, creaminess, and rich chocolate in an easy bite-sized treat. Because the recipe uses only simple pantry staples, it comes together quickly and requires no baking at all. Every ball blends the caramelized crispiness of crushed candy with smooth peanut butter and a glossy chocolate shell that sets beautifully. These treats feel both nostalgic and elevated, making them ideal for gifting, gatherings, or everyday snacking.
I started making these during a busy holiday season when I needed a fast dessert that still felt special. My kitchen counter became a lineup of bowls, spoons, and candy wrappers as I mixed batches for neighbors, family, and last-minute parties. Each time, the same thing happened—people asked for more before the tray was even empty. Their simple joy and undeniable crunch made them an instant tradition. Since then, these little candies have become my go-to treat whenever I need something reliable, impressive, and wonderfully homemade.
Ingredients
Equipment
Method
- Stir together crushed Butterfinger, peanut butter, powdered sugar, and vanilla until combined.
- Chill the mixture for 15 minutes until firm enough to roll.
- Scoop and roll into one-inch balls. Place on a parchment-lined tray.
- Melt chocolate in the microwave in short intervals until smooth.
- Dip each ball in melted chocolate, allowing excess to drip off.
- Return dipped balls to the tray and chill until the chocolate sets.
Nutrition
Notes
Tried this recipe?
Let us know how it was!The Essential Ingredients
Why Butterfinger Candy Works
Butterfinger candy bars have a distinct crunchy texture that holds up perfectly inside these no-bake treats. When crushed, the shards blend with peanut butter to create a mixture that is both crisp and creamy. This signature texture makes Butterfinger Balls: Your New 5-Ingredient, No-Bake Obsession! stand out among other peanut butter candies. The candy’s natural sweetness means the recipe needs no additional sugar.
Choosing the Right Peanut Butter
Creamy peanut butter binds the mixture, smoothing out the sharp edges of the candy pieces while adding richness. A classic, no-stir variety develops the best consistency for rolling. Because the recipe contains only five ingredients, the peanut butter’s flavor makes a real difference—using one with a roasted, balanced taste elevates every bite.
Creating the Perfect Base
Mixing to the Right Texture
The crushed candy and peanut butter combine to form a dough-like mixture. Stirring the ingredients until they hold together ensures the balls won’t crumble as you roll them. The mixture should be soft but firm enough to scoop cleanly. If it feels too soft, a brief chill firms it quickly. This step helps the candies maintain their shape during dipping.
Shaping the Balls
Using a small scoop or spoon makes shaping consistent and simple. Rolling each portion between your palms creates smooth, round pieces that chill evenly. Keeping the size around one inch ensures the final treats deliver the ideal balance of crunch and chocolate coating. As the lined tray fills, the anticipation builds for the final transformation during dipping.
Dipping in Chocolate
Choosing the Melt
Chocolate chips or melting wafers both work well for coating. Because this recipe relies on convenience, microwaving the chocolate in short bursts keeps things easy and mess-free. Once smooth and glossy, the chocolate becomes the perfect bath for each chilled ball. Dipping one at a time allows excess chocolate to drip off, creating clean, even shells.
Setting the Coating
Placing dipped candies back on a parchment-lined tray prevents sticking and creates a neat, professional finish. As the chocolate cools, it forms a firm shell that snaps lightly when bitten. This satisfying contrast defines Butterfinger Balls: Your New 5-Ingredient, No-Bake Obsession! Allowing the coated candies to chill briefly ensures they hold their shape for stacking or packaging.
Storing and Serving
Make-Ahead Convenience
These treats store beautifully in both the refrigerator and freezer. A chilled batch keeps its shape for several days, while a frozen batch lasts for months without losing flavor or texture. This makes them a fantastic make-ahead dessert for parties, care packages, or holiday tins. Because they thaw quickly, they transition effortlessly from freezer stash to serving plate.
Serving Ideas
Their small size makes them ideal for dessert boards, potluck trays, or simple weeknight treats. Pair them with coffee, cocoa, or cold milk for an indulgent moment that requires little effort. Wrapped in cellophane or arranged in mini cups, they also become delightful edible gifts. Their versatility makes them a natural favorite for both everyday snacking and special occasions.
FAQ
Can I use chunky peanut butter?
Yes, but the mixture may be harder to roll because of added texture.
Do I need to freeze the balls before dipping?
A short chill helps them stay firm but freezing is optional.
Can I use white or dark chocolate?
Absolutely. Any melting chocolate works well.
Why is my mixture too crumbly?
Add a small spoonful of peanut butter until it holds together.
How long do these last?
They keep up to one week in the fridge and two months in the freezer.
Conclusion
Butterfinger Balls: Your New 5-Ingredient, No-Bake Obsession! brings together irresistible texture and simple technique in a treat suitable for any season. Because they require no baking and just a handful of familiar ingredients, they deliver fast results without sacrificing flavor. Whether you share them or keep a stash tucked away, these sweet, crunchy bites offer consistent joy in every piece.


Leave a Reply