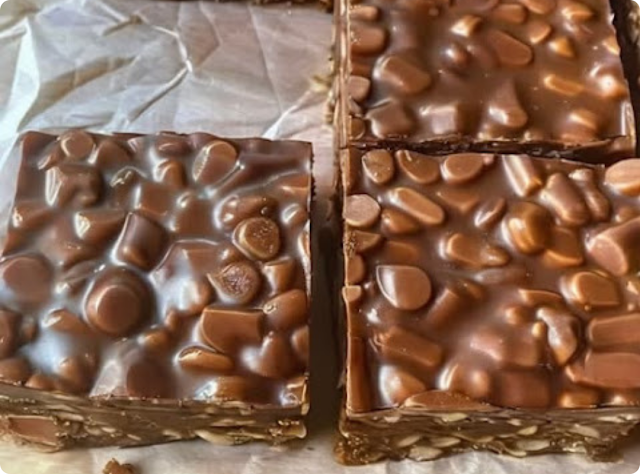
Caramel Chocolate Crunch Bars deliver everything a no-bake dessert should: fast assembly, rich flavor, and a satisfying crunch in every bite. Because this recipe relies on just a handful of pantry ingredients, it comes together effortlessly, making it perfect for busy seasons, casual gatherings, or those small moments when you need a little sweetness without the fuss. The mixture of melted chocolate and sweetened condensed milk forms a caramel-like base that binds the crunchy add-ins into a cohesive bar. Once topped with a smooth chocolate layer and chilled, the bars slice cleanly and hold their shape with ease.
My first introduction to these bars came from my neighbor, who would drop off a tin every December. She believed the best gifts were homemade, and these bars were always tucked between fudge and peppermint bark. One chilly afternoon, she invited me to make a batch with her, and I watched as she stirred chocolate into condensed milk until it turned glossy and thick. She folded in cereal by instinct, pressed the mixture into a pan, and added a final sweep of melted chocolate. As we waited for the bars to chill, she told stories of bake sales, winter potlucks, and surprise gifts delivered to friends who needed a little joy. That simple moment taught me that many of the sweetest recipes rely not on complexity, but on comfort and intention.
Ingredients
Equipment
Method
- Line an 8×8 pan with parchment paper, leaving overhang for easy removal.
- Melt 1.5 cups of chocolate chips with sweetened condensed milk in a microwave or saucepan, stirring until smooth.
- Stir in sea salt, cereal, and nuts if using, folding until evenly coated.
- Press the mixture firmly into the prepared pan, smoothing the top.
- Melt the remaining chocolate chips and spread over the top. Sprinkle with additional sea salt.
- Chill for 2 hours or until firm. Lift from the pan and slice into bars.
Nutrition
Notes
Tried this recipe?
Let us know how it was!Gathering the Essentials
Choosing the Base Ingredients
Caramel Chocolate Crunch Bars begin with a foundation of sweetened condensed milk and chocolate chips. These two ingredients melt together into a caramel-like binder that coats the crunchy add-ins. Because the filling depends on smooth melting, using high-quality chocolate creates a richer flavor and silkier texture. Sweetened condensed milk provides sweetness and structure without requiring stovetop candy making.
Selecting the Crunch
Cereal or nuts give these bars their signature texture. Crisp rice cereal offers a light crunch, while cornflakes create bigger flakes and a heartier bite. Chopped nuts, such as pecans or almonds, add warmth and richness. Mixing two textures—like cereal plus nuts—creates even more contrast. Because the recipe is flexible, you can choose whichever you have on hand.
Creating the Crunchy Center
Melting the Chocolate Mixture
In a microwave or on the stovetop, chocolate chips and sweetened condensed milk melt into a thick, glossy mixture. Stirring consistently prevents scorching and ensures the chocolate melts evenly. As the mixture warms, it takes on a caramel-like consistency that binds the crunchy ingredients together. A pinch of sea salt balances the sweetness and adds depth without overwhelming the chocolate.
Folding in the Crunch
Once the mixture is smooth, folding in the cereal or nuts creates a cohesive filling. Stir gently to avoid crushing the cereal too finely. The mixture should look well-coated and slightly sticky, with enough structure to press into a pan. Because the filling begins to set as it cools, working steadily helps keep the texture uniform throughout.
Building and Topping the Bars
Pressing into the Pan
Lining an 8×8 pan with parchment ensures the bars lift easily after chilling. Pressing the mixture firmly but evenly gives the bars structure and prevents gaps. A flat spatula or the bottom of a measuring cup works well for smoothing the surface. Ensuring an even layer creates clean slices after the bars have chilled.
Adding the Chocolate Shell
A final layer of melted chocolate adds a crisp top that complements the chewy interior. Pouring the chocolate over the pressed mixture and smoothing it creates a polished finish. A light sprinkle of flaky sea salt adds texture and visual appeal while brightening the chocolate flavor. As the top sets, the bars take on their signature layered look.
Serving, Storing, and Variations
Serving Suggestions
Caramel Chocolate Crunch Bars slice cleanly once fully chilled. Cutting them into small squares makes them ideal for gift boxes, dessert trays, or lunchbox treats. Their satisfying crunch pairs beautifully with coffee, hot cocoa, or cold milk. Because they travel easily, they shine at potlucks or gatherings where simple, shareable treats are appreciated.
Storing for Freshness
These bars keep well in the refrigerator for up to a week, staying firm and flavorful. Stored in the freezer, they hold beautifully for several months. Frozen bars thaw quickly, making them handy for last-minute cravings or unexpected guests. Their durability and structure also make them excellent candidates for gifting.
Easy Ways to Customize
A recipe this simple invites personalization. Mix-ins like pretzels, mini marshmallows, crushed cookies, or dried fruit transform the bars without altering their structure. Swirling a bit of peanut butter or adding a drizzle of white chocolate creates contrast and visual appeal. Each variation enhances the flavor while staying true to the bar’s simple foundation.
FAQ
Can I use dark chocolate instead of milk chocolate?
Yes. Dark chocolate gives the bars a richer, less sweet flavor.
Why won’t my chocolate mixture melt smoothly?
The heat may be too high. Melt low and slow, stirring often.
Can I use gluten-free cereal?
Absolutely. Just choose certified gluten-free cereal varieties.
Do the bars need to stay refrigerated?
Yes. Chilling keeps the layers firm and prevents melting.
Can I double the recipe?
Easily. Use a 9×13 pan and extend chilling time slightly.
Conclusion
Caramel Chocolate Crunch Bars deliver a beautiful mix of chewiness, crunch, and chocolate richness with minimal effort. Their simplicity makes them approachable, while their flavor and texture make them feel special. Because they require no baking and only a handful of ingredients, they fit effortlessly into busy days, festive seasons, and moments when a homemade treat feels just right. Whether you share them in gift boxes, bring them to gatherings, or keep them in the freezer for personal indulgence, these bars offer dependable sweetness in every bite.


Leave a Reply