First off, thank you so much for stopping by! Recipes like this one remind me exactly why I love sharing desserts with you all. They bring that warm, homey magic to even the simplest afternoons — the kind that fills the house with the smell of butter and sugar and makes everyone wander into the kitchen asking, “What’s baking?”
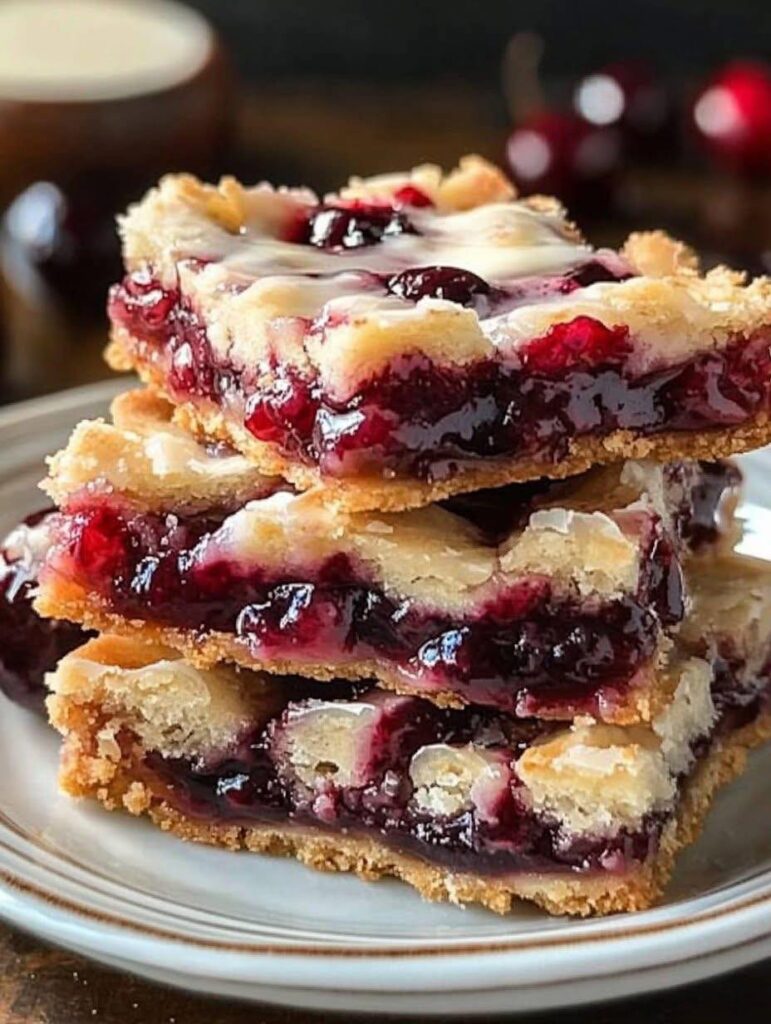
If you’re someone who loves the comforting taste of cherry pie but doesn’t always have the time (or patience!) to roll out dough and fuss with lattices, then these Cherry Bars are about to become your new favorite bake. They’re buttery, soft, and beautifully layered with sweet-tart cherry filling, finished with a delicate glaze that looks straight out of a bakery window.
Before we get into the recipe, don’t forget — you can subscribe below to have my newest cozy bakes and family-favorite desserts delivered straight to your inbox. You’ll be the first to know whenever something sweet is coming out of the oven!
Why You’ll Love These Cherry Bars
- 🥧 Tastes like cherry pie — without the pie pan or rolling pin!
- 👩🍳 Feeds a crowd — makes up to 35 bars, perfect for potlucks or family gatherings.
- 🍒 Perfectly balanced flavor — buttery crust meets tart, jammy cherry filling.
- 💕 Portable & shareable — slice, stack, and pack with ease.
- 🍬 Sweet, glossy glaze — adds that bakery-fresh finish everyone loves.
These bars are the kind of recipe that instantly becomes a family tradition. I first made them for a Sunday church bake sale — and not a crumb was left! Someone even told me, “This tastes like my grandma’s cherry pie, but better.” I’ll take that compliment any day.
What Do Cherry Bars Taste Like?
Imagine a soft, cookie-like crust that’s buttery and tender, layered with ribbons of bright cherry filling that burst with flavor, and topped with a light, sugary glaze that adds just the right amount of sweetness.
It’s like taking a slice of cherry pie and turning it into an easy-to-serve dessert bar. Each bite is pure nostalgia — golden edges, gooey center, and that hint of almond that ties everything together.
Benefits of This Recipe
- No fancy techniques — just good, honest baking.
- Great make-ahead dessert — stays fresh for days!
- Easily customizable with other fruit fillings.
- Freezes beautifully for future cravings.
Ingredients You’ll Need
For the Bars
- 1 ½ cups unsalted butter, softened
- 3 cups granulated sugar
- 1 ½ teaspoons salt
- 5 large eggs
- 1 ½ teaspoons vanilla extract
- 1 ½ teaspoons almond extract
- 5 ½ cups all-purpose flour
- 1 ½ teaspoons baking powder
- 2 cans (21 oz each) cherry pie filling
For the Glaze
- 1 cup confectioner’s sugar
- 3 tablespoons milk
Kitchen Tools You’ll Need
- Stand mixer or hand mixer
- 12×17-inch jelly roll pan
- Aluminum foil or parchment paper
- Mixing bowls
- Wire rack for cooling
Substitutions & Add-Ins
- 🍇 Swap cherry for blueberry or apple pie filling for a fun twist.
- 🍋 Replace almond extract with lemon extract for a bright, citrusy note.
- 🌰 Add chopped pecans or walnuts to the crust for crunch.
- 🧀 For extra richness, whisk cream cheese into your glaze for a tangy finish.
Step-by-Step Instructions
Step 1: Preheat and Prepare
Preheat your oven to 350°F (175°C). Line your jelly roll pan with parchment paper or foil, leaving some overhang for easy lifting later.
Step 2: Cream the Butter and Sugar
In a large mixing bowl, beat the butter, sugar, and salt together until light and fluffy — about 2–3 minutes.
Step 3: Add Eggs and Extracts
Beat in the eggs, one at a time, followed by the vanilla and almond extracts. The batter should look silky and pale.
Step 4: Mix the Dry Ingredients
In a separate bowl, whisk together flour and baking powder. Gradually add this to your wet ingredients, mixing just until combined.
Step 5: Layer the Batter and Cherry Filling
Spread about ⅔ of the dough evenly into the prepared pan. Spoon the cherry pie filling gently over the top, spreading it corner to corner. Then, drop small spoonfuls of the remaining dough across the top — they’ll spread and create a lovely marbled effect as they bake.
Step 6: Bake
Bake for 35–40 minutes, or until the top is lightly golden. The smell that fills your kitchen? Unreal.
Step 7: Cool and Glaze
Let the bars cool completely on a wire rack. In a small bowl, whisk together powdered sugar and milk until smooth, then drizzle it generously over the cooled bars.
Step 8: Slice and Serve
Cut into small squares or bars, and prepare for happy faces all around.
What to Serve with Cherry Bars
These bars pair beautifully with:
- A scoop of vanilla ice cream 🍨
- A mug of fresh coffee or tea ☕
- A light dusting of powdered sugar for a bakery finish
They also make wonderful gifts! Stack a few in a box lined with parchment, tie it with ribbon, and share the love.
Tips for Perfect Cherry Bars
- Use room temperature butter and eggs for the fluffiest texture.
- Don’t overbake — you want the bars to stay soft, not dry.
- Let the bars cool fully before glazing or cutting.
- Store with a piece of parchment between layers to prevent sticking.
Storage Instructions
Store leftover bars in an airtight container:
- At room temperature: up to 3 days
- In the fridge: up to 5 days
- In the freezer: up to 2 months (wrap tightly in plastic and foil)
To serve again, thaw at room temperature — or warm briefly in the microwave for that fresh-baked feel.
Frequently Asked Questions
Q: Can I use homemade cherry pie filling?
Absolutely! It adds a richer, fruitier flavor — just make sure it’s thick enough so it doesn’t make the crust soggy.
Q: Can I make these ahead of time?
Yes! These bars stay soft and flavorful for several days, making them perfect for holidays or events.
Q: Can I double this recipe?
Definitely — just bake in two pans or one large sheet pan if your oven allows.
General Information
Prep Time: 20 minutes
Cook Time: 40 minutes
Total Time: 1 hour
Yield: About 35 bars
Difficulty: Easy
Cuisine: American
Dietary: Vegetarian
Nutritional Information (Approx. per Bar)
- Calories: 220
- Fat: 8g
- Carbohydrates: 35g
- Protein: 2g
- Sugar: 22g
(These values are estimates and may vary by ingredient brand.)
Conclusion
There’s something timeless about these Cherry Bars — the buttery crust, the gleam of the glaze, and that sweet cherry filling that feels like home. They’re proof that dessert doesn’t need to be complicated to be special.
If cherry pie feels like too much work, this is your shortcut to the same comfort, baked in half the time — and I promise, no one will complain.
🍒 From my kitchen to yours, happy baking!


Leave a Reply