
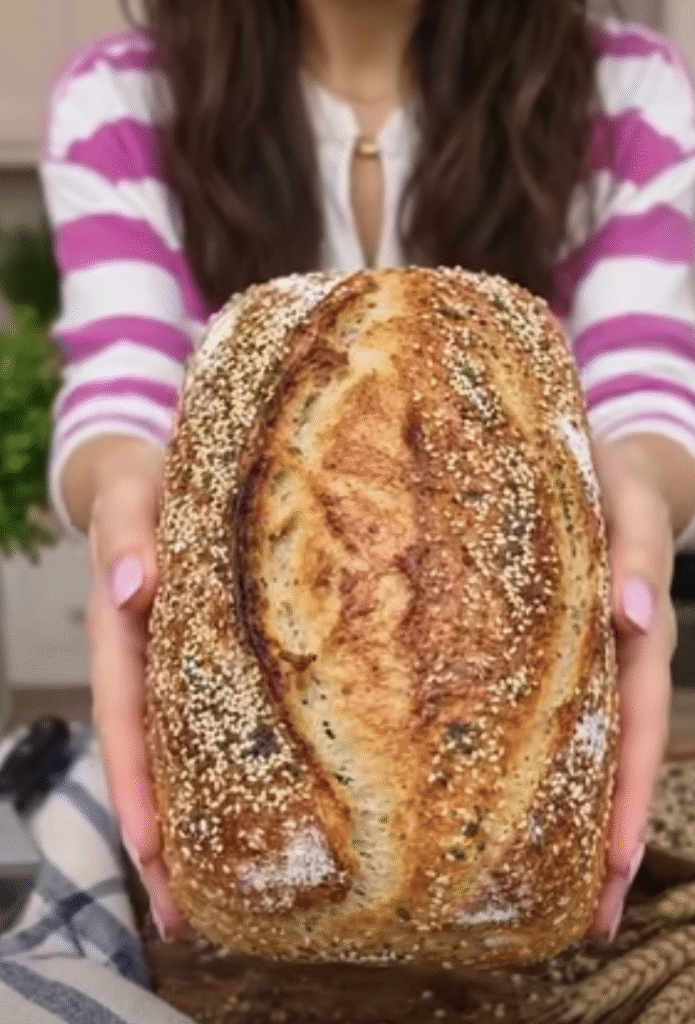
Easy No-Knead Rustic Sandwich Bread delivers everything you love about homemade bread: a beautifully golden crust, a soft and chewy interior, and a comforting bakery-style flavor. Best of all, you can make this delicious loaf without kneading dough or using a stand mixer.
With just four essential ingredients—flour, water, salt, and yeast—you can create an impressive homemade sandwich bread. The dough rises slowly overnight, allowing the yeast to develop flavor and create a light, airy crumb.
Unlike complicated bread recipes, this method requires very little hands-on work. Simply mix the ingredients, allow the dough to rest, shape it into a loaf, and bake.
Whether you enjoy fresh bread with butter, homemade sandwiches, or thick slices of golden toast, this beginner-friendly recipe makes everyday bread baking surprisingly simple.
I started experimenting with no-knead bread because I wanted the flavor and texture of traditional homemade bread without spending time kneading dough. My goal was a loaf with a crisp, rustic crust that I could still slice easily for sandwiches. After trying a slow overnight rise, I quickly understood why this method works so well. The dough developed beautiful bubbles, the kitchen filled with the smell of freshly baked bread, and the finished loaf had a gorgeous golden crust. The first slice tasted wonderful with a little butter. Since then, this simple bread has become one of my favorite recipes for relaxed weekend baking and homemade sandwiches.
Easy No-Knead Rustic Sandwich Bread
Ingredients
Equipment
Method
- In a large mixing bowl, combine 3 cups (375 g) all-purpose flour, 1 1/2 teaspoons fine salt, and 1/2 teaspoon instant yeast. Stir until evenly distributed.
- Gradually pour in 1 1/2 cups (360 ml) lukewarm water. Add 1 tablespoon olive oil or melted butter if desired. Stir with a wooden spoon or silicone spatula until a sticky, shaggy dough forms. Do not knead.
- Cover the bowl tightly with plastic wrap or a fitted lid, leaving enough room for the dough to expand.
- Leave the covered dough at room temperature for approximately 8-12 hours until noticeably expanded and bubbly. Check earlier if your kitchen is particularly warm.
- Lightly grease a standard 9-by-5-inch loaf pan or line it with parchment paper, leaving an overhang for easy removal.
- Lightly flour a clean work surface and gently scrape the risen dough out of the bowl using a spatula or dough scraper. Dust the dough and your hands lightly with flour as needed.
- Gently stretch the dough into a rough rectangle. Fold the long sides toward the center, then roll into a compact log approximately the length of the loaf pan. Avoid pressing out too many air bubbles.
- Transfer the shaped dough into the prepared loaf pan with the seam facing down. Gently adjust the dough so it sits evenly in the pan.
- Cover the pan loosely with a clean kitchen towel or lightly greased plastic wrap. Allow the dough to rise at room temperature for approximately 45-90 minutes, until noticeably puffy and approaching the top of the pan.
- During the final 20 minutes of the second rise, preheat the oven to 425°F (220°C). Position the oven rack in the center.
- If desired, brush the surface lightly with up to 1 tablespoon melted butter and sprinkle with 1 tablespoon sesame seeds, 1 tablespoon rolled oats, or a small pinch of flaky sea salt. For a rustic flour-dusted appearance, sprinkle with flour instead.
- Place the loaf pan on the center oven rack and bake for approximately 30-40 minutes until the crust becomes deep golden brown and the internal temperature reaches approximately 200-205°F (93-96°C).
- If the top browns too quickly, loosely cover the loaf with aluminum foil during the final 10 minutes of baking. Continue until fully baked.
- Remove the loaf pan from the oven and allow the bread to cool in the pan for approximately 5-10 minutes. Carefully transfer the loaf to a wire cooling rack.
- Cool the bread for at least 1 hour before slicing to allow the crumb to set and prevent a gummy texture.
- Use a sharp serrated bread knife to cut the loaf into approximately 12 even slices. Slice about 1/2 inch thick for sandwiches or slightly thicker for toast.
- Serve with butter, jam, honey, or favorite spreads. Use the bread for grilled cheese sandwiches, breakfast toast, turkey sandwiches, or peanut butter and jelly sandwiches.
Nutrition
Notes
Tried this recipe?
Let us know how it was!Why You'll Love This Easy No-Knead Rustic Sandwich Bread
The Perfect Combination of Rustic Crust and Soft Interior
Easy No-Knead Rustic Sandwich Bread combines the appealing appearance of artisan bread with the practical shape of a sandwich loaf.
The crust develops a beautiful golden-brown color during baking. Meanwhile, the inside stays tender, slightly chewy, and full of small, irregular air pockets.
Unlike some dense homemade loaves, this bread develops a lighter texture through slow fermentation.
The long resting period allows the dough to build structure naturally.
As the flour absorbs water, gluten proteins begin forming a network that helps support the loaf.
Over time, the yeast produces gas, creating bubbles throughout the dough.
Consequently, you can develop a satisfying bread texture without traditional kneading.
The result works beautifully for toast, grilled cheese, sandwiches, and simple slices with butter.
Additionally, the loaf pan gives the bread a consistent shape.
This makes slicing easier than working with a round artisan loaf.
You can cut thin slices for everyday sandwiches or thicker pieces for hearty breakfast toast.
The crust also softens slightly during storage, making the bread especially practical for packed lunches.
Only Four Basic Ingredients and Minimal Effort
One of the biggest advantages of Easy No-Knead Rustic Sandwich Bread is its short ingredient list.
You only need all-purpose flour, instant yeast, salt, and lukewarm water.
Olive oil or melted butter adds optional richness, but the bread works without either ingredient.
Because this recipe doesn't require a stand mixer, you can prepare the dough with a basic mixing bowl and wooden spoon.
Furthermore, the dough doesn't need constant attention.
After mixing, you simply cover the bowl and let it rest overnight.
During this time, the yeast slowly develops flavor while the dough becomes more elastic.
The following day, you shape the dough, allow a shorter second rise, and bake.
Although the recipe requires several hours from start to finish, most of that time involves waiting rather than active preparation.
Therefore, it fits conveniently into a weekend routine.
Mix the dough before bed, and you can finish baking the following morning.
For beginners, this method also removes much of the uncertainty associated with kneading.
You don't need to determine whether you've kneaded enough or worry about complicated dough techniques.
Instead, time does most of the work.
Essential Ingredients for the Best No-Knead Rustic Bread
Choosing Flour, Yeast, Salt, and Water
The ingredients in Easy No-Knead Rustic Sandwich Bread may seem simple, but each one serves an important purpose.
All-purpose flour forms the foundation of the dough.
It contains enough protein to create a satisfying bread structure while producing a tender interior.
For this recipe, use 3 cups, or approximately 375 grams, of all-purpose flour.
Measuring by weight offers the most consistent results.
Next, add 1/2 teaspoon instant yeast.
This small amount works well because the dough rises slowly over 8–12 hours.
Instant yeast mixes directly into the flour, so you don't need to dissolve it separately.
Salt provides flavor and helps regulate yeast activity.
Without enough salt, bread can taste bland even when it develops a beautiful crust.
Use 1 1/2 teaspoons of fine salt. If you measure coarse kosher salt, account for differences in crystal size.
Finally, add 1 1/2 cups of lukewarm water.
Water hydrates the flour and allows the dough to develop gluten.
Aim for comfortably lukewarm water rather than hot water.
Water around 85–95°F works well for most kitchens.
However, a warmer room can accelerate fermentation, so monitor the dough during its overnight rise.
Optional Ingredients and Flavorful Toppings
Although Easy No-Knead Rustic Sandwich Bread tastes wonderful with only four ingredients, you can customize it with several simple additions.
Olive oil adds a subtle richness and helps create a slightly softer crumb.
Alternatively, melted butter provides a familiar buttery flavor.
Use 1 tablespoon of either ingredient if desired.
For a decorative finish, sprinkle extra flour over the shaped loaf before baking.
This gives the surface a traditional artisan appearance.
You can also brush the dough lightly with melted butter and add sesame seeds.
Sesame seeds contribute a gentle nutty flavor and extra texture.
Rolled oats create a wholesome-looking crust and a slightly rustic appearance.
Meanwhile, flaky sea salt adds a delicate salty finish.
However, use only a light sprinkle because the dough already contains salt.
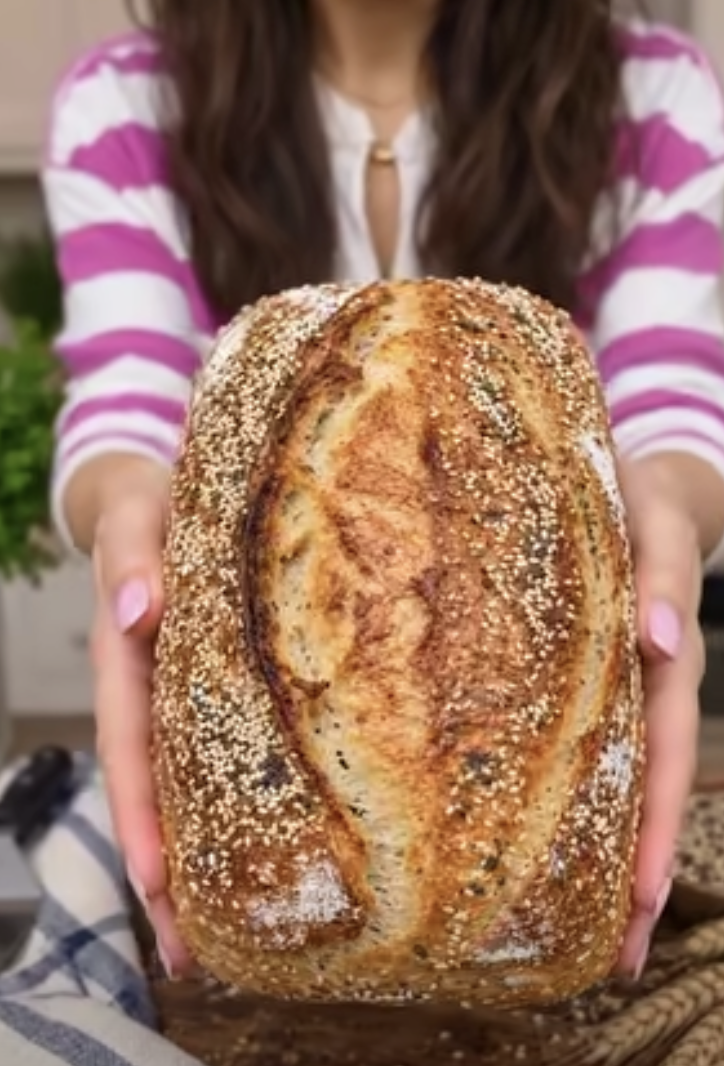
For a loaf similar to the reference photo, focus on a deep golden crust, a generous central split, and a light flour dusting.
The photographed bread also features a rounded artisan shape and textured surface.
You can achieve a similar appearance by using a loaf pan that supports the dough while allowing the top to rise freely.
A shallow lengthwise score can encourage an attractive opening, although very wet dough may spread or close around the cut.
Most importantly, avoid adding too many toppings. Excessive weight may interfere with the loaf's rise.
How to Make Easy No-Knead Rustic Sandwich Bread
Mixing and Fermenting the Dough Overnight
Preparing Easy No-Knead Rustic Sandwich Bread begins with combining the dry ingredients.
Add the flour, salt, and instant yeast to a large mixing bowl.
Stir thoroughly to distribute the yeast and salt.
Next, pour in the lukewarm water.
If you're using olive oil or melted butter, add it at this stage.
Mix everything with a wooden spoon or silicone spatula until the flour becomes fully hydrated.
The dough should look sticky, shaggy, and slightly uneven.
Unlike traditional bread dough, it won't form a smooth ball immediately.
That's completely normal.
Avoid adding large amounts of extra flour because a wetter dough helps create the characteristic open crumb.
Once you've mixed everything, cover the bowl with plastic wrap or a fitted lid.
Leave enough space for the dough to expand.
Allow the mixture to rest at room temperature for approximately 8–12 hours.
During fermentation, the dough should increase noticeably in volume and develop bubbles across its surface.
You'll also notice a mild, pleasantly yeasty aroma.
In a particularly warm kitchen, the dough may rise more quickly.
Therefore, check it earlier if your kitchen feels hot.
If the dough reaches its peak before you're ready to shape it, move the covered bowl to the refrigerator to slow fermentation.
Shaping, Proofing, and Baking the Loaf
After the overnight rise, Easy No-Knead Rustic Sandwich Bread needs a gentle shaping process.
First, prepare a standard 9-by-5-inch loaf pan.
Lightly grease it or line it with parchment paper.
Next, dust your work surface with a small amount of flour.
Use a dough scraper or spatula to transfer the risen dough onto the surface.
Because the dough contains considerable moisture, it may feel sticky.
Lightly flour your hands as needed, but avoid incorporating too much additional flour.
Gently stretch the dough into a rough rectangle.
Fold the longer sides toward the center, then roll the dough into a log.
Place it seam-side down in the prepared loaf pan.
Cover the pan loosely and allow the dough to rise for another 45–90 minutes.
The loaf should become noticeably puffy.
Meanwhile, preheat your oven to 425°F during the final 20 minutes.
If desired, dust the surface with flour or add your favorite toppings.
Bake for approximately 30–40 minutes until the crust becomes golden brown.
An instant-read thermometer should register around 200–205°F in the center.
If the crust browns too quickly, loosely cover the loaf with aluminum foil.
After baking, rest the bread in its pan for 5–10 minutes.
Then, transfer it to a wire rack.
Allow at least one hour of cooling before slicing.
This final step helps prevent a gummy interior.
Serving Ideas, Storage Tips, and Bread-Making Variations
Delicious Ways to Serve Homemade Rustic Sandwich Bread
Easy No-Knead Rustic Sandwich Bread works beautifully for everyday meals because its flavor complements both sweet and savory toppings.
For breakfast, toast a thick slice and spread it with softened butter.
Add strawberry jam, honey, or your favorite fruit preserves for a simple morning treat.
Alternatively, top toasted bread with scrambled eggs and sliced avocado.
The slightly chewy interior creates an excellent base for hearty breakfast toppings.
For lunch, use two slices to prepare a classic turkey and cheese sandwich.
Fresh lettuce, tomatoes, and mustard pair especially well with the mild bread flavor.
You can also make grilled cheese sandwiches.
Brush the outer surfaces lightly with butter, add your favorite melting cheese, and cook in a skillet until golden.
The rustic crust develops a satisfying crunch while the cheese melts inside.
For another option, toast slices and rub them with a freshly cut garlic clove.
Then, drizzle with olive oil and add chopped tomatoes for a simple bruschetta-inspired snack.
This bread also complements soups.
Try serving it alongside tomato soup, vegetable soup, or chicken noodle soup.
Because the loaf has a sturdy structure, it holds up well when dipping.
How to Store, Freeze, and Customize Your Bread
Proper storage helps Easy No-Knead Rustic Sandwich Bread maintain its flavor and texture.
First, allow the loaf to cool completely.
Then, store it in a bread bag or airtight container at room temperature for approximately 2–3 days.
Avoid refrigerating ordinary bread for routine storage because refrigeration accelerates starch firming and can make the loaf taste stale more quickly.
For longer storage, freezing offers a better option.
Slice the bread before freezing so you can remove individual portions as needed.
Place parchment paper between slices and transfer them to a freezer-safe bag.
Freeze for up to 3 months for the best flavor.
When you're ready to eat, toast slices directly from frozen or thaw them at room temperature.
You can also experiment with flour variations.
For example, replace up to 1 cup of all-purpose flour with whole wheat flour.
This adds a heartier flavor, although the loaf may need slightly more water and may develop a denser crumb.
Alternatively, add a tablespoon of dried herbs for a savory variation.
Rosemary, thyme, and Italian seasoning work especially well.
For a seeded loaf, sprinkle sesame seeds or rolled oats over the surface before baking.
If you prefer a softer crust, brush the hot loaf lightly with melted butter after removing it from the oven.
For a more pronounced rustic appearance, leave the crust unbuttered and allow it to cool on a wire rack.
Ingredients
Yield: 1 loaf, approximately 12 slices | Prep time: 15 minutes | First rise: 8–12 hours | Second rise: 45–90 minutes | Bake time: 30–40 minutes
For the Easy No-Knead Rustic Sandwich Bread
- 3 cups all-purpose flour (375 g)
- 1 1/2 teaspoons fine salt
- 1/2 teaspoon instant yeast
- 1 1/2 cups lukewarm water (360 ml)
- 1 tablespoon olive oil or melted butter (optional)
- 1–2 tablespoons additional flour, for dusting as needed
Optional Toppings
- 1 tablespoon melted butter, for brushing
- 1 tablespoon sesame seeds
- 1 tablespoon rolled oats
- 1/8 teaspoon flaky sea salt, or a light sprinkle to taste
Instructions
1. Combine the dry ingredients. In a large bowl, stir together 3 cups flour, 1 1/2 teaspoons salt, and 1/2 teaspoon instant yeast until evenly distributed.
2. Add the water. Gradually add 1 1/2 cups lukewarm water and the optional olive oil or melted butter. Mix until a sticky, shaggy dough forms. Do not knead.
3. Cover the dough. Cover the bowl with plastic wrap or a fitted lid, allowing space for the dough to expand.
4. Let it rise overnight. Rest at room temperature for 8–12 hours until the dough grows noticeably and develops bubbles across its surface. Check sooner in a warm kitchen.
5. Prepare the loaf pan. Grease a 9-by-5-inch loaf pan or line it with parchment paper.
6. Transfer the dough. Lightly flour a work surface and gently scrape the risen dough onto it. Dust your hands and the dough lightly with flour as needed.
7. Shape the loaf. Stretch the dough into a rough rectangle. Fold the long sides toward the center, then roll into a log approximately the length of the pan.
8. Place in the pan. Transfer the dough into the prepared loaf pan, seam-side down. Adjust it gently so it sits evenly.
9. Allow the second rise. Cover loosely and let rise for 45–90 minutes until noticeably puffy and approaching the top of the pan.
10. Preheat the oven. During the final 20 minutes of the second rise, preheat the oven to 425°F (220°C).
11. Add toppings. If desired, lightly brush with melted butter and sprinkle with sesame seeds, rolled oats, or flaky sea salt. For a rustic look, use a light flour dusting instead.
12. Bake. Bake on the center rack for 30–40 minutes until the loaf develops a deep golden-brown crust and reaches an internal temperature of approximately 200–205°F.
13. Check the crust. If the surface browns too quickly, loosely cover it with aluminum foil during the final 10 minutes.
14. Remove from the pan. Cool the bread in its pan for 5–10 minutes, then transfer it to a wire rack.
15. Cool completely. Allow the loaf to cool for at least 1 hour before slicing to help the crumb set.
16. Slice the bread. Cut the loaf with a sharp serrated knife. Aim for approximately 1/2-inch slices for sandwiches or slightly thicker slices for toast.
17. Serve and enjoy. Serve with butter, jam, honey, cheese, or savory toppings. Use for grilled cheese, breakfast toast, and everyday sandwiches.
Frequently Asked Questions
1. Can I make Easy No-Knead Rustic Sandwich Bread without a Dutch oven?
Yes. This recipe uses a standard 9-by-5-inch loaf pan instead of a Dutch oven.
The pan supports the dough during baking and creates a practical sandwich loaf shape.
Although a Dutch oven often helps produce a thicker, crunchier artisan crust, the loaf pan method still develops a beautifully golden exterior.
For best results, preheat your oven thoroughly before baking.
2. Why is my no-knead bread dough so sticky?
A sticky dough is completely normal for Easy No-Knead Rustic Sandwich Bread.
The recipe uses a relatively high amount of water compared with flour.
This hydration helps create a tender interior and allows the dough to develop structure during its long resting period.
Instead of adding large amounts of flour, lightly dust your hands and work surface during shaping.
A dough scraper also makes sticky dough easier to handle.
3. Can I let no-knead bread rise longer than 12 hours?
Yes, but the ideal fermentation time depends on your room temperature and yeast activity.
A cooler kitchen may allow a longer rise, while a warm kitchen may cause the dough to ferment more quickly.
If the dough rises too far, it can lose strength and collapse.
Watch for a bubbly surface, noticeable expansion, and a pleasantly fermented aroma.
If you need to delay shaping, refrigerate the dough after its initial rise to slow yeast activity.
4. How do I make my rustic sandwich bread softer?
For a softer loaf, add the optional tablespoon of olive oil or melted butter.
You can also brush the warm crust with melted butter after baking.
Additionally, avoid overbaking the loaf.
Use an instant-read thermometer to check when the center reaches approximately 200–205°F.
Once the bread cools completely, store it in an airtight container to help retain moisture.
5. Why does my homemade bread turn gummy when sliced?
Slicing bread while it's still hot can compress the crumb and create a gummy appearance.
During cooling, moisture redistributes and the interior continues to firm up.
Therefore, allow the bread to rest on a wire rack for at least 1 hour before cutting.
Underbaking can also produce a wet center, so check the internal temperature before removing the loaf from the oven.
Accurate flour and water measurements help prevent overly wet dough.
Conclusion
Easy No-Knead Rustic Sandwich Bread proves that homemade bakery-style bread doesn't require complicated equipment or hours of hands-on work.
With just flour, yeast, salt, and water, you can create a golden loaf with a tender, chewy interior and a deliciously rustic crust.
The overnight fermentation develops flavor naturally, while the simple shaping method makes the recipe approachable for beginners.
Because the loaf bakes in a standard sandwich pan, it produces practical slices for toast, sandwiches, and everyday meals.
Enjoy it fresh with butter, turn it into grilled cheese, or freeze individual slices for convenient breakfasts.
Whether you're baking bread for the first time or simply want a reliable homemade loaf, this easy no-knead recipe offers a satisfying way to enjoy fresh bread straight from your own oven.



Leave a Reply