
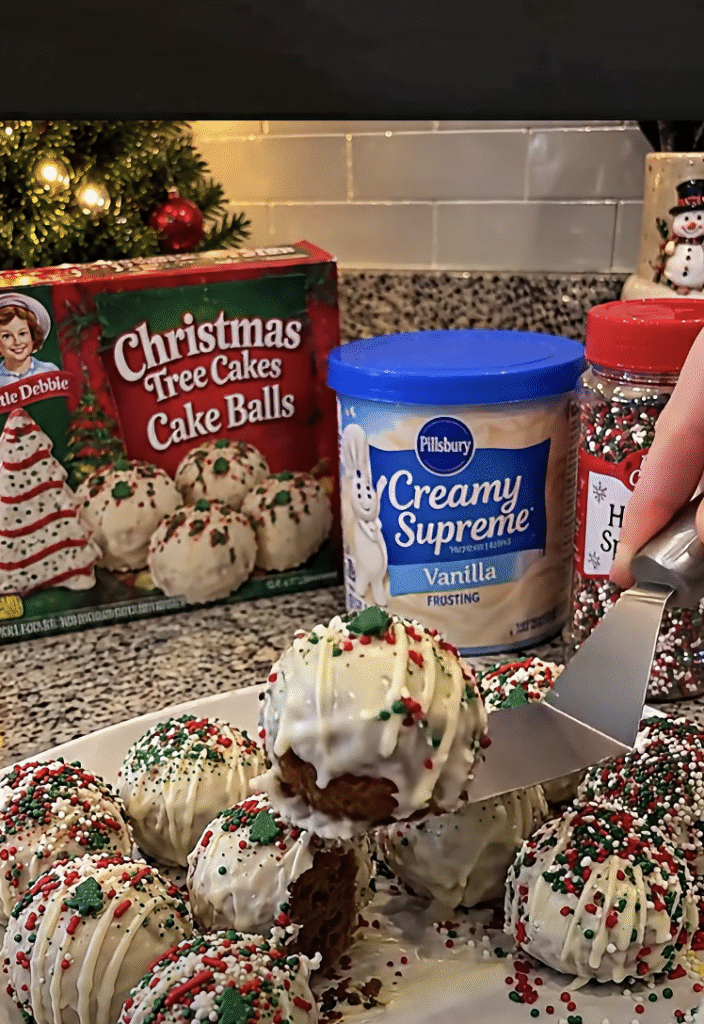
Little Debbie Christmas Tree Cake Balls are a festive, creamy, no-bake dessert that transforms classic Christmas Tree Cakes into delicious bite-sized holiday treats. With a soft cake center, a rich cream cheese filling, and a smooth white chocolate coating, these adorable cake balls deliver everything you love about holiday sweets in one irresistible bite.
The best part? You only need three main ingredients: Little Debbie Christmas Tree Cakes, softened cream cheese, and white melting chocolate. Add colorful Christmas sprinkles or red decorating icing, and you'll have a beautiful homemade treat that looks perfect on any holiday dessert table.
These easy Christmas cake balls work wonderfully for cookie exchanges, Christmas parties, holiday dessert trays, edible gifts, and family celebrations.
Plus, you don't need an oven, complicated equipment, or advanced baking skills. Simply mix, roll, chill, dip, and decorate.
I love discovering simple holiday desserts that look impressive without requiring an entire afternoon in the kitchen. One Christmas season, I wanted to prepare something festive for a dessert platter but didn't feel like baking another batch of cookies. I had a box of Christmas Tree Cakes and some cream cheese, so I decided to turn them into little truffle-style treats. The soft cake filling tasted rich and nostalgic, while the white chocolate shell added just the right amount of sweetness. After decorating them with red and green sprinkles, they looked beautiful beside the other Christmas goodies. Now, I enjoy how easily this simple idea can make an ordinary holiday gathering feel extra special.
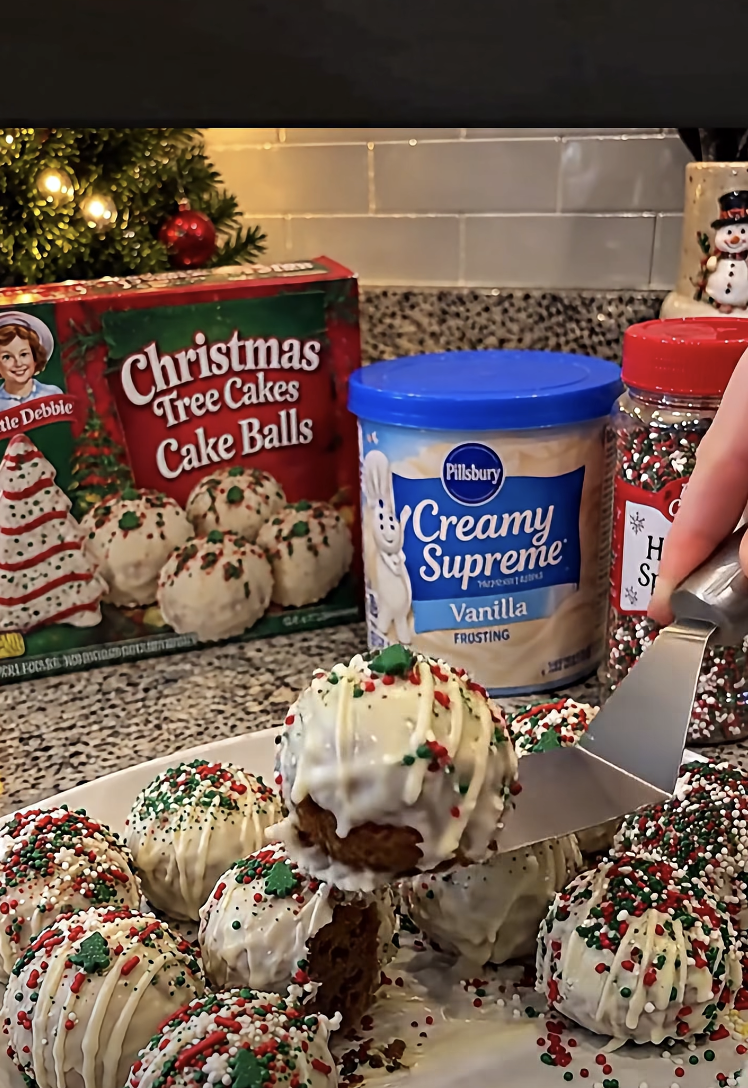
Little Debbie Christmas Tree Cake Balls
Ingredients
Equipment
Method
- Line a baking sheet or large tray with parchment paper.
- Place the five Little Debbie Christmas Tree Cakes in a large mixing bowl. Crumble them into small pieces using a fork or clean hands.
- Add 4 ounces of softened cream cheese and mix thoroughly until the cake crumbs and cream cheese form a soft, uniform dough.
- Scoop tablespoon-sized portions of dough and roll into approximately 16 to 20 smooth balls. Arrange them on the parchment-lined tray.
- Refrigerate the shaped cake balls for 20 to 30 minutes until firm enough to dip.
- Place white melting chocolate in a microwave-safe bowl. Melt according to package directions, heating in short intervals and stirring until completely smooth.
- Use a fork or dipping tool to coat each chilled cake ball completely in melted white chocolate. Allow excess coating to drip off before transferring it to the parchment-lined tray.
- Decorate with green or assorted holiday sprinkles while the coating remains wet. Add white chocolate drizzle if desired. Apply optional red decorating icing once the coating is firm enough.
- Allow the chocolate coating to set completely. Refrigerate briefly if needed to help it firm up.
- Transfer the cake balls to a festive serving platter or mini paper candy cups. Keep refrigerated until serving.
Nutrition
Notes
Tried this recipe?
Let us know how it was!Why You'll Love Little Debbie Christmas Tree Cake Balls
A Festive Dessert with Just Three Main Ingredients
One of the biggest reasons to love Little Debbie Christmas Tree Cake Balls is their simplicity.
Unlike traditional cake pops, these treats don't require you to bake a cake from scratch or prepare homemade frosting.
Instead, you start with ready-made Little Debbie Christmas Tree Cakes.
These soft snack cakes already contain sweet frosting and a tender cake filling, making them an excellent base for no-bake cake balls.
When you crumble the cakes and mix them with softened cream cheese, the ingredients form a soft, moldable dough.
The cream cheese adds richness and helps hold the cake mixture together.
Next, a coating of melted white chocolate creates a smooth outer shell.
As the chocolate sets, it provides a pleasant contrast to the soft, creamy center.
The result tastes similar to a cake truffle, with a rich interior and a sweet chocolate coating.
Another advantage is the easy decoration.
Red decorating icing and green sprinkles recreate the classic colors of Christmas Tree Cakes.
Alternatively, colorful holiday sprinkles give each cake ball a cheerful appearance.
The finished treats look festive enough for a special celebration, yet the preparation remains beginner-friendly.
Because the recipe uses only a few ingredients, you can also prepare it without a long grocery list.
Perfect for Christmas Parties, Gifts, and Dessert Trays
Little Debbie Christmas Tree Cake Balls make an excellent addition to holiday celebrations.
Their small size makes them easy to serve at parties, cookie exchanges, and family gatherings.
Guests can enjoy one or two without needing plates or utensils.
Additionally, these cake balls look beautiful arranged on a festive platter.
The creamy white chocolate coating provides a bright background for colorful red and green decorations.
You can place them in miniature paper candy cups for a polished presentation.
They also make thoughtful homemade holiday gifts.
Arrange several cake balls in a small treat box lined with parchment paper.
Then, keep them refrigerated until you're ready to share them.
For Christmas dessert tables, pair these treats with sugar cookies, gingerbread cookies, brownies, and chocolate truffles.
Their white coating and colorful sprinkles add variety to the display.
Another benefit is their make-ahead convenience.
You can prepare the cake balls before your holiday gathering and refrigerate them until serving.
This saves time during busy celebrations.
Whether you're making treats for coworkers, neighbors, friends, or family members, this recipe offers an easy way to share something festive and delicious.
Choosing the Best Ingredients for Little Debbie Christmas Tree Cake Balls
Christmas Tree Cakes and Softened Cream Cheese
The foundation of Little Debbie Christmas Tree Cake Balls comes from two simple ingredients.
First, you'll need five Little Debbie Christmas Tree Cakes.
These seasonal snack cakes feature soft cake layers, sweet filling, and decorative frosting.
Because they already contain frosting, they crumble into a moist mixture that works well for cake balls.
For the best results, use fresh cakes with a soft texture.
Avoid cakes that have become dry or stale.
You don't need to remove the frosting or decorations before mixing.
Simply crumble the entire cakes into a large bowl.
Next, add four ounces of softened cream cheese.
Cream cheese contributes a slightly tangy flavor that balances the sweetness of the snack cakes.
It also helps bind the crumbs into a smooth dough.
For the best texture, use regular block-style cream cheese.
Whipped cream cheese or cream cheese spread may create a softer mixture because those products can contain different amounts of moisture.
Allow the cream cheese to soften at room temperature briefly before mixing, but don't leave it unrefrigerated for more than two hours.
Softened cream cheese blends more easily with the cake crumbs.
Start mixing with a spoon or spatula.
Then, continue until the mixture holds together when pressed.
The dough should feel soft and slightly sticky without becoming runny.
If it seems too soft to shape, refrigerate it for a few minutes before rolling.
White Melting Chocolate and Christmas Decorations
The white chocolate coating gives Little Debbie Christmas Tree Cake Balls their signature appearance.
For this recipe, use twelve ounces of white melting chocolate.
White melting wafers or candy melts work especially well because they melt smoothly and create a firm coating as they cool.
You can also use white baking chocolate, although its melting behavior may differ.
Follow the instructions on your chocolate package for the best results.
Avoid overheating the chocolate because excessive heat can make it thick, grainy, or difficult to use.
For easy dipping, melt the coating in a microwave-safe bowl using short intervals.
Stir between intervals until smooth.
The decorations provide the finishing touch.
Green sprinkles create a classic holiday appearance, while red decorating icing adds a bright contrast.
You can also use mixed Christmas sprinkles with red, green, and white pieces.
For a look similar to the reference photo, coat the cake balls in white chocolate, drizzle additional melted white coating over the top, and scatter holiday sprinkles across each one.
Tiny green Christmas tree-shaped sprinkles make an especially charming addition.
For the neatest appearance, decorate while the chocolate coating remains slightly wet.
This helps the sprinkles stick securely.
If you're using red decorating icing, you can apply it after the coating sets.
Tips for Making Perfect Little Debbie Christmas Tree Cake Balls
Mixing, Rolling, and Chilling the Cake Balls
Although Little Debbie Christmas Tree Cake Balls require no baking, a few simple techniques help produce attractive, evenly shaped treats.
Start by crumbling all five Christmas Tree Cakes into a large mixing bowl.
Use clean hands, a fork, or a sturdy spatula to break the cakes into small pieces.
Next, add the softened cream cheese.
Mix thoroughly until the cake crumbs and cream cheese form a uniform dough.
You shouldn't see large chunks of cream cheese remaining.
Once the mixture comes together, divide it into small portions.
A tablespoon-sized cookie scoop makes this step easier.
However, you can also portion the dough with a regular spoon.
Roll each portion between your palms until it forms a smooth ball.
Aim for similar sizes so the treats look uniform and chill evenly.
Depending on their size, the recipe should produce approximately sixteen to twenty cake balls.
Arrange the balls on a parchment-lined baking sheet or tray.
Leave a little space between them.
Next, transfer the tray to the refrigerator.
Chill for twenty to thirty minutes, or until the balls become firm enough to dip.
This step makes coating much easier.
Without chilling, the soft filling may fall apart when you dip it into warm chocolate.
However, avoid freezing the cake balls until completely solid immediately before dipping.
Extremely cold cake balls can encourage condensation and may cause the coating to crack as temperatures change.
Melting, Dipping, and Decorating Like a Pro
Coating Little Debbie Christmas Tree Cake Balls becomes easy once you use the right method.
First, place the white melting chocolate in a microwave-safe bowl.
Heat according to the package directions, using short intervals and stirring frequently.
The chocolate should become completely smooth and fluid.
If you notice unmelted pieces, continue stirring before adding more heat.
Next, remove the chilled cake balls from the refrigerator.
Work with a few at a time, keeping the remaining balls chilled.
Place one cake ball into the melted coating.
Use a fork or dipping tool to turn it gently until the chocolate covers the entire surface.
Lift the ball and allow excess coating to drip back into the bowl.
Then, carefully transfer it to the parchment-lined tray.
Repeat with the remaining cake balls.
For the neatest finish, gently tap the dipping fork against the bowl to remove excess chocolate.
While the coating remains wet, add holiday sprinkles.
If you prefer a drizzled appearance, allow the first coating to set slightly.
Then, drizzle a small amount of additional melted white chocolate over the top.
Immediately sprinkle with red, green, or mixed Christmas decorations.
Finally, let the chocolate set completely before handling.
You can place the tray in the refrigerator briefly to speed up the setting process.
Creative Variations, Serving Ideas, and Storage Tips
Fun Decorating Ideas and Flavor Variations
One of the most enjoyable things about Little Debbie Christmas Tree Cake Balls is how easily you can customize their appearance.
The classic version features white chocolate and red-and-green Christmas decorations.
However, you can create several different styles from the same recipe.
For a traditional Christmas tree-inspired appearance, drizzle thin red icing lines across the white chocolate coating.
Then, add green sanding sugar or sprinkles.
For a snowy holiday look, use white chocolate drizzle and tiny white sugar pearls.
You can also create a colorful assortment with red, green, and gold sprinkles.
If you prefer a stronger chocolate flavor, dip some cake balls in milk chocolate or dark chocolate instead of white chocolate.
This creates a different flavor balance while keeping the soft cake center.
For an extra festive presentation, place each cake ball in a miniature red or green paper candy cup.
Another option involves making smaller bite-sized treats.
Smaller cake balls work especially well for large dessert platters.
However, they may require slightly more coating because their combined surface area increases.
You can also experiment with a small amount of peppermint extract in the filling.
Start with just a drop or two because peppermint flavor can become overpowering quickly.
Whatever variation you choose, keep the mixture firm enough to roll and chill it before dipping.
How to Serve, Store, and Make Cake Balls Ahead
Little Debbie Christmas Tree Cake Balls are ideal for holiday entertaining because you can prepare them in advance.
After the chocolate coating sets completely, place the cake balls in an airtight container.
For the best appearance, arrange them in a single layer.
If you need to stack them, separate the layers with parchment paper.
Because the filling contains cream cheese, keep the cake balls refrigerated at 40°F or below.
For the best freshness and texture, enjoy them within five days.
Before serving, you can let them sit at room temperature for approximately ten minutes to slightly soften the center.
However, avoid leaving them unrefrigerated for more than two hours.
For gifting, arrange the chilled cake balls in a decorative treat box.
Use mini candy liners to prevent them from touching.
If you're transporting them, place the box in an insulated cooler with ice packs.
You can also freeze fully coated cake balls for longer storage.
Place them in an airtight freezer-safe container, separating layers with parchment.
For best quality, enjoy within one to two months.
Thaw them in the refrigerator before serving.
Keep the container closed during thawing to help minimize condensation on the chocolate coating.
These simple storage techniques help maintain their festive appearance and creamy texture.
Ingredients
Prep Time: 20 minutes | Chill Time: 20–30 minutes | Coating Setting Time: Approximately 10 minutes | Total Time: 50–60 minutes | Yield: 16–20 cake balls
For the Cake Balls
- 5 Little Debbie Christmas Tree Cakes
- 4 oz cream cheese, softened
- 12 oz white melting chocolate or white candy melts
Optional Decorations
- 1 tablespoon red decorating icing
- 2 tablespoons green sprinkles
- 2 tablespoons assorted holiday sprinkles
Decoration quantities provide a generous assortment. Use only the decorations you prefer; any unused toppings won't affect the recipe.
Instructions
- Prepare the tray. Line a baking sheet or large tray with parchment paper.
- Crumble the cakes. Place the five Little Debbie Christmas Tree Cakes in a large mixing bowl. Break them into small crumbs using a fork or clean hands.
- Mix the filling. Add four ounces of softened cream cheese. Stir until the ingredients form a smooth, soft dough that holds together.
- Shape the cake balls. Scoop tablespoon-sized portions and roll them between your palms. Arrange approximately 16–20 cake balls on the prepared tray.
- Chill the filling. Refrigerate the cake balls for 20–30 minutes, or until firm enough to dip.
- Melt the coating. Place the white melting chocolate in a microwave-safe bowl. Melt according to the package instructions, using short intervals and stirring until smooth.
- Dip the cake balls. Working with one ball at a time, use a fork or dipping tool to coat each chilled cake ball completely. Allow excess chocolate to drip away.
- Decorate. Place the coated cake balls back on the parchment-lined tray. Add holiday sprinkles while the coating remains wet. If desired, drizzle with additional melted white chocolate or add red decorating icing after the coating firms.
- Let the coating set. Allow the cake balls to set completely, refrigerating briefly if necessary.
- Serve or store. Arrange the finished cake balls on a festive platter or in mini paper candy cups. Keep refrigerated until serving.
Frequently Asked Questions
1. Can I make Little Debbie Christmas Tree Cake Balls ahead of time?
Yes. These cake balls work wonderfully as a make-ahead holiday dessert.
Prepare them one or two days before your celebration and store them in an airtight container in the refrigerator.
For the best appearance, separate stacked layers with parchment paper.
Keep them chilled until you're ready to serve.
2. Do I need to remove the frosting from Christmas Tree Cakes?
No. You can crumble the entire snack cakes, including the frosting and decorative coating.
The frosting adds sweetness and helps create the soft filling.
Simply combine everything with softened cream cheese until the mixture forms a moldable dough.
3. Can I use chocolate chips instead of white melting chocolate?
You can use white chocolate chips, but they may not melt as smoothly as candy melts or melting wafers.
White chocolate chips often contain ingredients that help them maintain their shape during baking.
Therefore, melting wafers usually provide an easier coating experience.
If you use chocolate chips, melt them gently and stir frequently to avoid overheating.
4. Why are my Christmas Tree Cake Balls falling apart?
The mixture may be too warm or soft.
First, make sure you mix the cakes and cream cheese thoroughly.
Then, chill the shaped balls for at least twenty minutes before dipping.
If the dough still feels excessively sticky, refrigerate it a little longer.
Also, avoid using overly hot melted chocolate, which can soften the filling during dipping.
5. Can I freeze Little Debbie Christmas Tree Cake Balls?
Yes. You can freeze the fully coated cake balls in an airtight freezer-safe container.
For best quality, enjoy them within one to two months.
Separate layers with parchment paper to prevent sticking.
When you're ready to serve, thaw them in the refrigerator.
This helps preserve the creamy centers and chocolate coating.
Conclusion
Little Debbie Christmas Tree Cake Balls offer a fun and delicious way to transform familiar holiday snack cakes into festive homemade treats.
With just three main ingredients, you can create soft, creamy cake centers surrounded by a sweet white chocolate shell.
Their colorful Christmas decorations make them especially attractive for holiday parties, cookie exchanges, dessert platters, and edible gifts.
Even better, the recipe requires no baking and uses simple preparation techniques.
For the best results, soften the cream cheese before mixing, chill the rolled cake balls before dipping, and melt the white chocolate gently.
Then, decorate with red icing, green sprinkles, or your favorite holiday toppings.
Whether you're preparing a last-minute Christmas dessert or planning treats for a special celebration, these easy cake balls bring plenty of sweetness, festive color, and homemade charm to the holiday season.
Leave a Reply