No-Bake Chocolate Oat Bars: A Sweet and Simple Treat are the kind of dessert that proves you do not need an oven or complicated steps to make something truly satisfying. These bars combine chewy oats, rich chocolate, and a buttery base into a dessert that feels nostalgic, comforting, and indulgent. Because they come together quickly with pantry staples, they are perfect for busy days, warm weather, or moments when you want a homemade treat without much effort.
This recipe strikes a balance between snack and dessert. The oats add heartiness, while the chocolate layer brings sweetness and richness. As a result, these bars work just as well for an afternoon pick-me-up as they do for a casual dessert after dinner. No-Bake Chocolate Oat Bars: A Sweet and Simple Treat are reliable, flexible, and always a crowd-pleaser.
I first started making these bars during a time when baking felt like too much effort after long days. Turning on the oven was the last thing I wanted, yet I still craved something homemade. Stirring oats into a warm butter and sugar mixture felt manageable, and pressing everything into a pan was almost relaxing. When the chocolate set and the bars were sliced, they disappeared quickly. Since then, this recipe has become one I return to whenever I want something familiar, easy, and comforting.
Ingredients
Equipment
Method
- Line a baking dish with parchment paper.
- Melt butter and brown sugar in a saucepan over medium heat until smooth.
- Remove from heat and stir in vanilla and peanut butter if using.
- Mix in oats and optional nuts or coconut until well combined.
- Press two-thirds of the oat mixture firmly into the prepared pan.
- Melt chocolate chips and spread evenly over the oat base.
- Sprinkle remaining oat mixture on top and press gently.
- Refrigerate for at least 2 hours until set, then slice and serve.
Nutrition
Notes
Tried this recipe?
Let us know how it was!Why No-Bake Chocolate Oat Bars Are Always a Win
Simple Ingredients With Big Comfort
No-Bake Chocolate Oat Bars: A Sweet and Simple Treat rely on ingredients most kitchens already have. Rolled oats provide structure and chew. Butter and brown sugar create a rich, caramel-like base. Chocolate chips melt into a smooth topping that balances the oats perfectly.
Because the ingredient list is short, each component matters. The oats should be old-fashioned rather than quick oats for the best texture. Brown sugar adds depth compared to white sugar. Chocolate chips bring just enough sweetness without overwhelming the bars.
Additionally, peanut butter can be added for extra creaminess. Although optional, it adds richness and helps the layers hold together more firmly.
No Oven, No Stress
One of the biggest advantages of this recipe is that it requires no baking. This makes it ideal for hot days, small kitchens, or quick preparation. Everything happens on the stovetop and in one pan.
Because the bars chill in the refrigerator to set, the process feels forgiving. There is no worrying about overbaking or dry edges. Instead, patience during chilling is the key to perfect slices.
Ingredient Breakdown and Helpful Tips
Choosing the Right Oats and Chocolate
Old-fashioned rolled oats work best because they keep their shape and provide chew. Quick oats can make the bars softer and less structured. Steel-cut oats are not recommended, as they will not soften properly.
Semi-sweet chocolate chips strike the right balance of sweetness. However, dark chocolate chips work well if you prefer a less sweet finish. Milk chocolate creates a softer, sweeter topping.
Optional Add-Ins for Texture
Chopped nuts add crunch, while shredded coconut adds chew and subtle sweetness. These additions are optional, but they can add interest without changing the base recipe.
If adding extras, mix them into the oat layer rather than the chocolate layer. This helps keep the topping smooth and clean.
Step-by-Step Method Explained Clearly
Preparing the Oat Base
Start by lining a baking dish with parchment paper. This makes removal and slicing easier later.
In a saucepan over medium heat, melt the butter with brown sugar, stirring until smooth and slightly thickened. Remove from heat and stir in vanilla extract and peanut butter if using.
Add the oats and mix until fully coated. If using nuts or coconut, fold them in now.
Press about two-thirds of the oat mixture firmly into the prepared pan, creating an even base. Set the remaining mixture aside.
Adding the Chocolate Layer
Melt the chocolate chips gently, either in a microwave or over a double boiler. Stir until smooth.
Pour the melted chocolate evenly over the oat base, spreading it gently to the edges. Sprinkle the remaining oat mixture over the top and press lightly so it adheres to the chocolate.
Refrigerate the pan for at least two hours, or until fully set.
Slicing, Serving, and Storage
Cutting Clean Bars
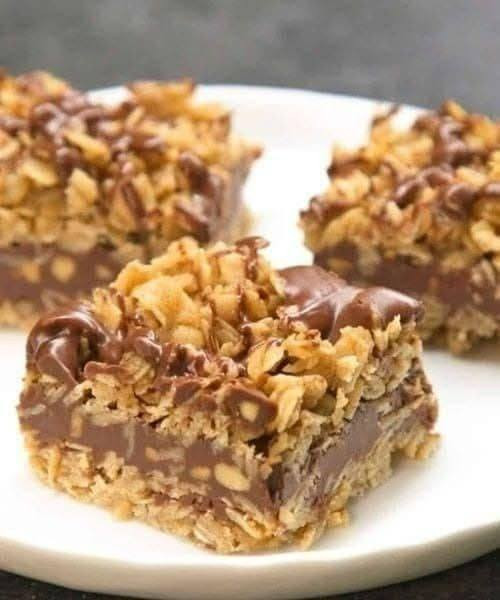
Once set, lift the bars out using the parchment paper. Use a sharp knife to slice into squares or rectangles. For cleaner cuts, wipe the knife between slices.
No-Bake Chocolate Oat Bars: A Sweet and Simple Treat hold their shape best when chilled, especially if the kitchen is warm.
Storage Tips
Store the bars in an airtight container in the refrigerator for up to one week. They can also be frozen for longer storage. If freezing, separate layers with parchment paper.
These bars travel well when kept cool, making them ideal for lunches or gatherings.
Variations to Try
Flavor Twists
You can swap peanut butter for almond butter or sunflower seed butter. Adding a pinch of salt to the chocolate layer enhances flavor contrast.
For a festive version, drizzle white chocolate on top. For a richer version, add cocoa powder to the oat mixture.
Adjusting Sweetness
If you prefer less sweetness, reduce the brown sugar slightly or use dark chocolate. The oats help balance sweetness naturally.
Common Mistakes and How to Avoid Them
Not Pressing the Base Firmly
If the oat layer is not pressed firmly, the bars may crumble. Use the back of a spoon or a flat-bottomed cup to compact it well.
Cutting Too Soon
Allow enough time for chilling. Cutting before the chocolate sets will cause messy slices. Patience pays off.
No-Bake Chocolate Oat Bars: A Sweet and Simple Treat are forgiving, but chilling time is essential.
Frequently Asked Questions
Do these bars need to stay refrigerated?
They hold best when chilled, especially in warm environments.
Can I make them dairy-free?
Yes, use dairy-free butter and chocolate.
Are they gluten-free?
They can be if you use certified gluten-free oats.
Can kids help make these?
Yes, this recipe is very kid-friendly with supervision during melting.
Do they freeze well?
Yes, they freeze and thaw beautifully.
Conclusion
No-Bake Chocolate Oat Bars: A Sweet and Simple Treat are proof that easy recipes can still feel special. With simple ingredients, no oven, and reliable results, they fit effortlessly into everyday life. Whether made for family, friends, or just yourself, these bars deliver comfort, flavor, and convenience in every bite.


Leave a Reply