
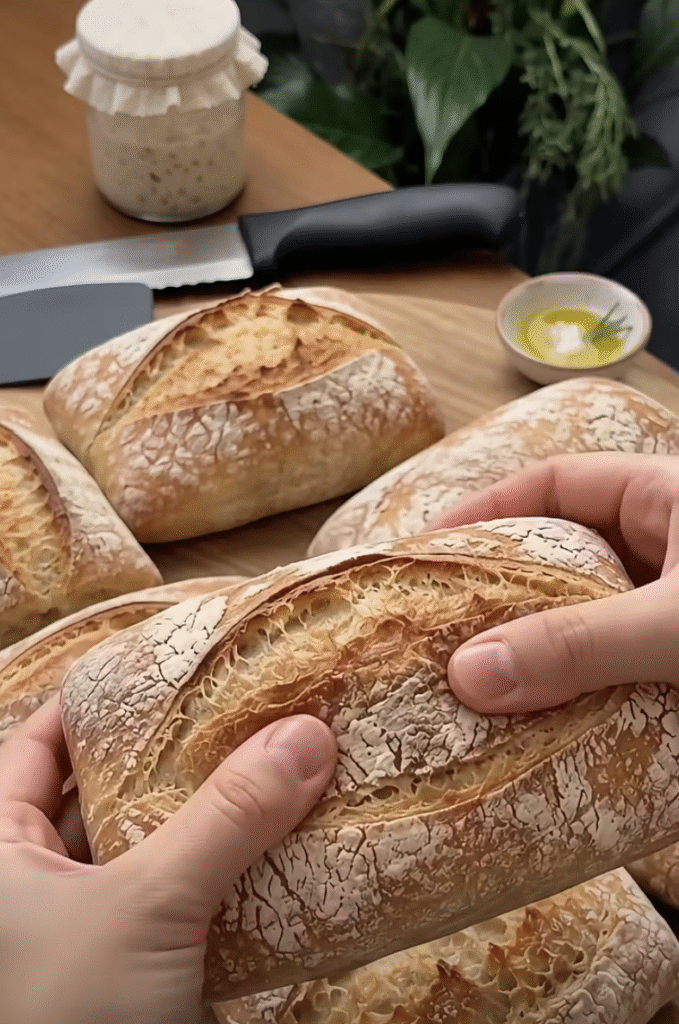
Sourdough Ciabatta is a beautiful Italian-style bread with a crisp golden crust, soft chewy center, and those wonderful irregular holes that make rustic ciabatta so distinctive. Made with an active sourdough starter, bread flour, water, and salt, this homemade bread develops a deep flavor through slow fermentation.
Unlike traditional sandwich bread, sourdough ciabatta uses a high-hydration dough that feels soft, sticky, and almost impossible to shape at first. However, gentle folds build strength while protecting the delicate air bubbles that create its signature open crumb.
This recipe requires patience rather than difficult techniques. You'll mix the dough, perform a few gentle folds, allow it to ferment, and refrigerate it overnight. The following day, you'll shape two rustic loaves and bake them until beautifully golden.
Whether you enjoy fresh sourdough ciabatta with olive oil, make hearty sandwiches, or serve it alongside soup, this homemade bread brings wonderful flavor and texture to the table.
I first became interested in sourdough ciabatta after enjoying a rustic sandwich made with wonderfully airy bread. The crust had a satisfying crunch, while the inside felt soft and chewy. I wanted to recreate that texture at home, but the sticky dough seemed intimidating. After experimenting with gentle folds and overnight fermentation, I discovered that handling the dough less actually helped produce better results. The first time I sliced into a loaf and saw those irregular air pockets, I knew the extra patience had been worthwhile. Now, I especially enjoy baking ciabatta for sandwiches, dipping into olive oil, and serving with homemade soups.
Sourdough Ciabatta
Ingredients
Equipment
Method
- Mix 500 g bread flour with 375 g water until no dry flour remains. Cover and rest for 30 minutes.
- Add 100 g active sourdough starter and incorporate gently. Dissolve 10 g salt in remaining 25 g water, then work it into the dough. Add optional olive oil.
- Cover and rest for 30 minutes. Perform one set of stretch-and-folds or coil folds with wet hands.
- Repeat folds every 30 minutes for a total of 3–4 sets, until dough develops greater elasticity and strength.
- Continue bulk fermentation until dough is puffy, bubbly, and approximately 50–75% larger. Total bulk fermentation commonly takes 4–6 hours from starter incorporation, depending on temperature and starter strength.
- Cover and refrigerate dough for 8–12 hours overnight.
- Generously flour work surface, gently turn out cold dough, stretch into a rectangle, and divide into 2 loaves without pressing out air bubbles.
- Transfer loaves to parchment paper dusted with flour or semolina. Cover loosely and proof for 45–60 minutes while preheating oven to 475°F with baking stone, steel, or heavy baking sheet inside.
- Transfer loaves to hot baking surface and introduce steam using an oven-safe steam pan. Bake at 475°F for 10 minutes, reduce to 450°F, remove steam source carefully, and bake another 15–20 minutes until deeply golden.
- Transfer ciabatta loaves to a wire cooling rack and cool completely before slicing.
Nutrition
Notes
Tried this recipe?
Let us know how it was!Why You'll Love This Homemade Sourdough Ciabatta
A Crispy Crust and Beautifully Open Interior
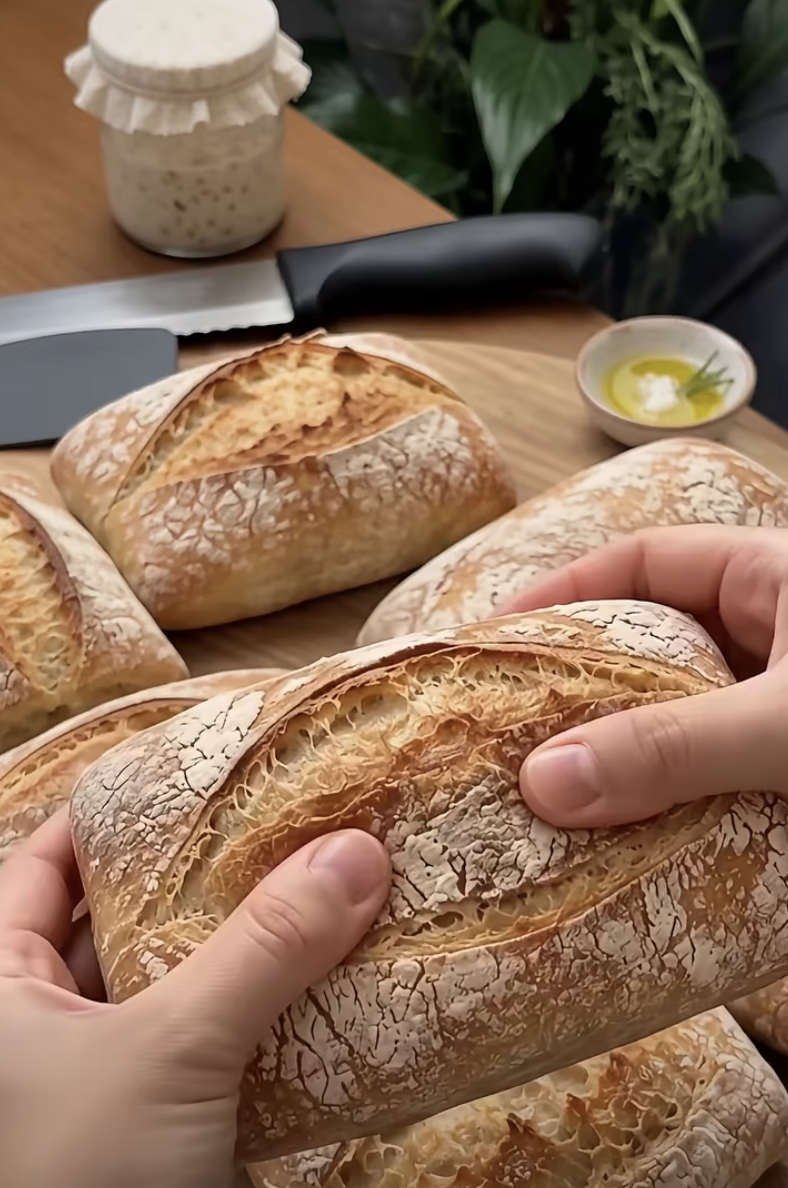
The defining feature of sourdough ciabatta is its contrast between a thin, crisp crust and a tender, airy interior.
The exterior develops a rich golden color during baking. Meanwhile, the inside contains irregular holes that form as fermentation produces gas throughout the dough.
These pockets give ciabatta its familiar rustic appearance.
Unlike tightly structured sandwich bread, ciabatta has a more open crumb and slightly chewy texture.
This makes it especially enjoyable for sandwiches because the bread offers structure without feeling overly dense.
The high water content also plays an important role.
This recipe uses 400 grams of water and 500 grams of bread flour, along with an active sourdough starter.
Assuming the starter contains equal weights of flour and water, the final dough reaches approximately 82% hydration.
That generous amount of moisture encourages an open crumb but also creates a sticky dough.
Rather than adding large amounts of flour during mixing, you'll strengthen the dough through gentle stretch-and-folds.
Over time, these folds help create a more elastic structure that can hold fermentation gases.
Additionally, baking with steam allows the bread to expand before the crust sets.
The result is a rustic loaf with a beautiful crust, satisfying chew, and naturally developed sourdough flavor.
The Benefits of Slow Sourdough Fermentation
Another reason to love sourdough ciabatta is the flavor that develops during fermentation.
Instead of relying on commercial yeast, this recipe uses an active sourdough starter.
The starter contains naturally occurring yeasts and lactic acid bacteria that ferment the dough.
As fermentation progresses, these microorganisms produce gases and organic acids.
Consequently, the bread develops a more complex flavor than a quickly mixed, minimally fermented dough.
The recipe includes a room-temperature fermentation period followed by overnight refrigeration.
The first stage allows the dough to rise and develop strength.
Meanwhile, the cold fermentation slows activity and gives the dough additional time to develop flavor.
This overnight rest also makes the recipe easier to fit into your schedule.
You can prepare the dough in the afternoon or evening, refrigerate it overnight, and bake the following day.
Because the dough requires minimal shaping, the final preparation remains relatively straightforward.
The resulting loaves work beautifully for sandwiches, toast, and dipping.
If you enjoy sourdough bread but want something different from a traditional round boule, ciabatta offers a delicious alternative.
Choosing the Best Ingredients for Sourdough Ciabatta
Bread Flour, Water, and Active Starter
Great sourdough ciabatta begins with a few carefully measured ingredients.
Bread flour provides the foundation.
For this recipe, use 500 grams of bread flour.
Bread flour typically contains more protein than all-purpose flour, helping the dough develop the gluten strength needed to support an open crumb.
Because ciabatta dough contains a large amount of water, strong flour makes handling easier.
Next, measure 400 grams of water.
You'll use 375 grams during the initial mixing stage and reserve the remaining 25 grams for incorporating the salt.
Using a kitchen scale improves consistency because small differences in hydration can noticeably change the dough's texture.
The sourdough starter is equally important.
You'll need 100 grams of active starter, ideally at 100% hydration.
A healthy starter should look bubbly, smell pleasantly tangy, and show a noticeable rise after feeding.
For predictable fermentation, use the starter near its peak activity.
If your starter hasn't risen well after feeding, give it more time before beginning the recipe.
Salt strengthens flavor and supports dough structure.
The recipe uses 10 grams, which equals approximately 2% of the main flour weight.
Finally, you can add one tablespoon of extra virgin olive oil for a slightly richer crumb.
However, olive oil remains optional, and traditional lean ciabatta works beautifully without it.
Understanding High-Hydration Dough
High-hydration dough behaves differently from firm sandwich bread dough.
At first, sourdough ciabatta may look loose, sticky, and difficult to handle.
That's normal.
The generous water content allows the flour to hydrate thoroughly and encourages a more open interior.
However, it also means you can't shape the dough like a firm ball of conventional bread dough.
Instead, you'll rely on resting periods and gentle folds.
During the initial flour-and-water rest, the flour absorbs moisture and gluten development begins.
This 30-minute rest helps prepare the dough for the starter and salt.
Afterward, stretch-and-folds or coil folds gradually build strength.
Each fold helps organize the gluten network without aggressive kneading.
Over several rounds, the dough should become smoother and more elastic.
It may still feel sticky, but it should hold together better than it did immediately after mixing.
Avoid adding extra flour directly into the dough simply because it feels wet.
Too much additional flour changes the hydration and may produce a denser loaf.
Instead, wet your hands lightly when performing folds.
During final shaping, use flour or semolina on the work surface to prevent sticking.
Most importantly, handle the dough gently so you preserve the gas bubbles that develop during fermentation.
How to Make Sourdough Ciabatta with an Open Crumb
Mixing, Folding, and Bulk Fermentation
Making sourdough ciabatta starts with a short flour-and-water rest.
In a large bowl, combine 500 grams of bread flour with 375 grams of water.
Mix until no dry flour remains.
Cover the bowl and let the mixture rest for 30 minutes.
Next, add 100 grams of active sourdough starter.
Use your hands or a dough scraper to work the starter into the dough until evenly distributed.
Then, dissolve 10 grams of salt in the remaining 25 grams of water.
Add the salted water and gently squeeze and fold the dough until combined.
If you're using olive oil, incorporate it at this stage.
Cover the bowl and allow the dough to rest for 30 minutes.
Now, begin strengthening it through stretch-and-folds or coil folds.
For a coil fold, slide wet hands beneath the center of the dough, lift gently, and allow the ends to fold underneath.
Rotate the bowl and repeat.
Perform three to four sets, spacing them approximately 30 minutes apart.
After the final fold, let the dough continue fermenting until noticeably puffy and bubbly.
Depending on room temperature and starter activity, the entire bulk fermentation may take approximately four to six hours from starter incorporation.
Look for an increase of roughly 50% to 75% in volume rather than waiting for the dough to double completely.
Once it reaches the proper stage, cover the bowl and refrigerate for 8 to 12 hours.
Shaping and Baking Rustic Ciabatta Loaves
The following day, prepare a generously floured work surface.
Remove the dough from the refrigerator and carefully turn it out.
Avoid punching it down or pressing out the air.
Gently stretch the dough into a rough rectangle.
Because ciabatta has a rustic shape, you don't need perfectly straight edges.
Use a floured bench scraper to divide the rectangle into two equal pieces.
Each piece will become one loaf.
Transfer the dough pieces onto parchment paper dusted with flour or semolina.
Handle them carefully to preserve the bubbles.
Cover loosely and let them rest for 45 to 60 minutes.
Meanwhile, preheat your oven to 475°F with a baking stone, baking steel, or heavy baking sheet inside.
Allow the baking surface to heat thoroughly.
Once the oven reaches temperature, carefully transfer the loaves onto the hot surface.
Introduce steam using an oven-safe steam pan and hot water, following safe oven-handling practices.
Bake for approximately 10 minutes at 475°F.
Then, reduce the temperature to 450°F and carefully remove the steam source once the initial steaming period ends.
Continue baking for another 15 to 20 minutes.
The finished loaves should have a deeply golden crust and feel relatively light for their size.
For additional confidence, check the center temperature. Aim for approximately 205°F to 210°F.
Finally, transfer the loaves to a wire rack and allow them to cool completely before slicing.
Serving Ideas, Storage Tips, and Troubleshooting
Delicious Ways to Serve Fresh Sourdough Ciabatta
Sourdough ciabatta works wonderfully for sandwiches because its crisp crust and chewy interior provide excellent texture.
One of the easiest ways to enjoy it is with extra virgin olive oil.
Slice the bread into thick pieces and dip them into olive oil with a little sea salt and freshly ground black pepper.
You can also serve the bread with balsamic vinegar for additional flavor.
For sandwiches, cut a ciabatta loaf horizontally and add your favorite ingredients.
Fresh mozzarella, tomatoes, basil, and pesto create a delicious Italian-inspired combination.
Grilled chicken, roasted peppers, and arugula also work beautifully.
If you enjoy hearty lunches, fill ciabatta with turkey, cheese, lettuce, and Dijon mustard.
The sturdy crust helps hold the fillings together.
For breakfast, toast a thick slice and top it with scrambled eggs or mashed avocado.
You can also prepare open-faced sandwiches with ricotta, honey, and fresh fruit.
Ciabatta makes an excellent companion to soups and stews.
Serve it alongside tomato soup, minestrone, vegetable soup, or hearty bean stew.
The chewy texture makes the bread particularly satisfying for dipping.
For a simple appetizer, brush sliced ciabatta with olive oil and toast until lightly crisp.
Top with chopped tomatoes, garlic, basil, and a pinch of salt.
These toasted slices make a wonderful bruschetta-style appetizer.
How to Store Ciabatta and Fix Common Problems
Fresh sourdough ciabatta tastes best on the day you bake it.
Its crust has the most satisfying crunch shortly after cooling.
However, you can store leftovers and enjoy them later.
Once the loaves cool completely, keep them in a bread bag or loosely wrapped container at room temperature.
For the best quality, enjoy the bread within two days.
Avoid refrigerating ciabatta because refrigeration generally accelerates staling.
For longer storage, freeze the cooled loaves or individual slices.
Wrap them well and place them in freezer-safe bags.
Frozen ciabatta maintains good quality for approximately three months.
To refresh a loaf, thaw it and warm it briefly in a 350°F oven.
If your ciabatta turns out dense, the dough may need more fermentation time or a stronger gluten structure.
Make sure your starter shows strong activity before mixing.
Also, perform the scheduled folds to help strengthen the dough.
If the loaves spread too much, the dough may be overfermented or too weak to support its hydration.
Using strong bread flour and monitoring fermentation closely can help.
If the crust browns before the center cooks, reduce the oven temperature slightly during the final baking stage.
If the crumb feels gummy, allow the bread to cool completely before slicing.
Finally, remember that ciabatta naturally develops irregular shapes and air pockets.
Perfectly symmetrical loaves aren't necessary for delicious results.
Ingredients
Yield: 2 ciabatta loaves | Hands-on prep: approximately 25–40 minutes | Bulk fermentation: 4–6 hours | Cold fermentation: 8–12 hours | Final proof: 45–60 minutes | Baking: 25–30 minutes
- 500 g bread flour
- 400 g water, divided into 375 g and 25 g
- 100 g active sourdough starter, preferably 100% hydration
- 10 g fine salt
- 1 tablespoon (15 ml) extra virgin olive oil (optional)
- 2 tablespoons bread flour or semolina, approximately, for dusting
Instructions
1. Mix the flour and water. Combine 500 g bread flour and 375 g water in a large bowl. Stir until no dry flour remains. Cover and rest for 30 minutes.
2. Add the starter and salt. Mix in 100 g active sourdough starter. Dissolve 10 g salt in the remaining 25 g water, then gently work it into the dough. Add optional olive oil if using.
3. Rest and begin folding. Cover the bowl and rest for 30 minutes. Perform a set of stretch-and-folds or coil folds with lightly wet hands.
4. Build dough strength. Repeat the folds every 30 minutes until you complete 3 to 4 sets. The dough should gradually become smoother and more elastic.
5. Complete bulk fermentation. Let the dough continue fermenting until noticeably puffy, bubbly, and approximately 50% to 75% larger. Allow roughly 4 to 6 hours for the full bulk fermentation, adjusting for room temperature and starter activity.
6. Cold ferment overnight. Cover the dough and refrigerate for 8 to 12 hours.
7. Shape the loaves. Generously flour the work surface. Carefully turn out the cold dough, gently stretch it into a rectangle, and divide it into two rustic loaves without deflating.
8. Final proof. Transfer the loaves onto flour- or semolina-dusted parchment paper. Cover loosely and rest for 45 to 60 minutes. Meanwhile, preheat the oven to 475°F with a baking stone, steel, or heavy baking sheet inside.
9. Bake with steam. Transfer the loaves to the hot baking surface. Introduce steam using an oven-safe steam pan. Bake at 475°F for 10 minutes, then reduce to 450°F, remove the steam source carefully, and bake for another 15 to 20 minutes until deeply golden.
10. Cool completely. Transfer the loaves to a wire rack. Allow them to cool completely before slicing to preserve the texture of the crumb.
Frequently Asked Questions
1. Why doesn't my sourdough ciabatta have large air holes?
Small air holes often result from insufficient fermentation, weak gluten development, or excessive handling during shaping. Use an active starter, complete the recommended folds, and allow the dough to become noticeably airy before refrigeration. Also, avoid pressing out the bubbles when dividing the loaves.
2. Can I make sourdough ciabatta without a Dutch oven?
Absolutely. Ciabatta works especially well on a baking stone, baking steel, or heavy baking sheet. Use a properly managed steam source during the first part of baking to help the loaves expand and develop a crisp crust.
3. Why is sourdough ciabatta dough so sticky?
This recipe uses approximately 82% hydration when you account for a 100% hydration starter. That high moisture level naturally creates a wet, sticky dough. Instead of adding extra flour, use wet hands for folding and flour the work surface during final shaping.
4. Can I refrigerate sourdough ciabatta dough for longer than 12 hours?
Yes, depending on starter activity and dough fermentation. Some doughs tolerate 16 to 18 hours of refrigeration, but longer fermentation can increase acidity and weaken the dough. Monitor its condition and shorten the room-temperature bulk fermentation if you plan an extended cold rest.
5. How do I keep sourdough ciabatta crust crispy?
Cool the bread completely on a wire rack and avoid sealing it in plastic while warm. Store it at room temperature for short periods, or freeze it for longer storage. To restore crispness, warm the loaf briefly in a 350°F oven before serving.
Conclusion
Sourdough Ciabatta combines the deep flavor of natural fermentation with a beautiful rustic appearance, a crisp golden crust, and a wonderfully airy interior.
Although high-hydration dough may feel challenging at first, gentle folding, patient fermentation, and careful shaping make the process approachable.
The active sourdough starter develops flavor, while the overnight cold fermentation adds complexity and helps the dough fit into a practical baking schedule.
For the best results, use strong bread flour, measure the water accurately, and watch the dough's fermentation rather than relying entirely on the clock.
Whether you enjoy the finished bread with olive oil, prepare delicious sandwiches, or serve it with homemade soup, sourdough ciabatta offers a satisfying way to enjoy naturally leavened bread.
With practice, you'll become more comfortable handling wet dough and developing the beautiful irregular crumb that makes ciabatta so special.
Leave a Reply