
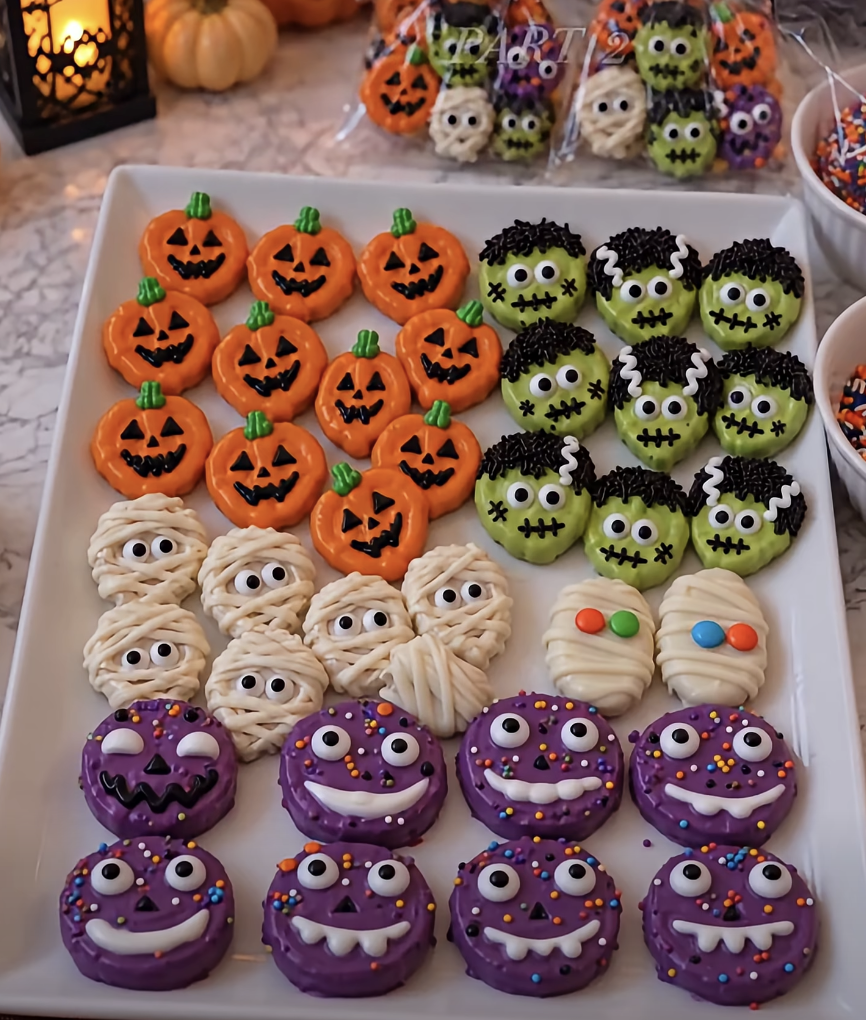
Halloween Chocolate-Covered Mini Pretzels are the perfect combination of sweet, salty, crunchy, and festive. These adorable Halloween treats turn ordinary mini pretzels into colorful jack-o'-lanterns, Frankenstein monsters, spooky mummies, and silly purple monsters. Best of all, you can make all four designs without turning on the oven.
Whether you're preparing treats for a Halloween party, filling goodie bags for trick-or-treaters, or planning a fun activity with the kids, these chocolate-covered pretzels offer an easy and creative option. You only need a handful of ingredients, some colorful candy melts, and a little imagination.
Every Halloween, I love putting together a colorful tray of homemade treats that looks impressive but doesn't require hours in the kitchen. One year, I tried decorating mini pretzels with different candy melt colors, and the results instantly became a family favorite. The pumpkin faces made everyone smile, while the little mummy pretzels disappeared from the platter first. Since then, these Halloween Chocolate-Covered Mini Pretzels have become one of my favorite seasonal projects. I especially enjoy arranging the four designs together because the bright colors create such a cheerful Halloween display. Plus, everyone can choose their favorite spooky character.
Halloween Chocolate-Covered Mini Pretzels – 4 Ways
Ingredients
Equipment
Method
- Line two large baking sheets with parchment paper. Divide approximately 40 mini pretzels into four groups of 10.
- Melt orange, green, white, and purple candy melts separately in microwave-safe bowls using 20–30-second intervals. Stir until smooth. Add a little refined coconut oil if necessary.
- Dip 10 pretzels into orange candy melts. Place on parchment paper. Once set, pipe triangle eyes, noses, and jack-o'-lantern smiles with black decorating icing. Add green stems if desired.
- Dip 10 pretzels into green candy melts. Add candy eyes while soft, then press black sprinkles onto the top for hair. After setting, pipe stitches and mouths with black icing.
- Create bride characters from some green Frankenstein pretzels by piping white zigzag stripes through the dark sprinkle hair.
- Dip 10 pretzels into white candy melts. Attach candy eyes, then drizzle more melted white candy over the surface in overlapping lines to create mummy bandages.
- Dip the remaining 10 pretzels into purple candy melts. Add candy eyes and Halloween sprinkles while soft. Once firm, decorate with black icing and optional white candy melt smiles.
- Allow all decorated pretzels to set on parchment paper for approximately 20 minutes until the coating hardens. Let the icing dry fully according to package directions.
- Arrange the pretzels on a serving platter or place them in an airtight container with parchment paper between layers.
Nutrition
Notes
Tried this recipe?
Let us know how it was!Why You'll Love These Halloween Chocolate-Covered Mini Pretzels
A Sweet and Salty Treat for Every Halloween Celebration
Halloween Chocolate-Covered Mini Pretzels combine the satisfying crunch of salty pretzels with a smooth, sweet candy coating. Each bite delivers a delicious contrast of flavors and textures.
Unlike complicated Halloween desserts, these treats require no baking, special pans, or advanced decorating skills. In fact, most of the preparation involves dipping pretzels into melted candy and adding a few simple decorations.
Another reason to love this recipe is its flexibility. You can create all four characters or focus on one design if you're short on time.
These Halloween treats work especially well for:
- Classroom Halloween celebrations
- Halloween dessert boards
- Children's birthday parties in October
- Halloween movie nights
- Trick-or-treat party favors
- Fall bake sales and gatherings
- Homemade Halloween gift boxes
Additionally, their small size makes them ideal for sharing. Guests can sample several designs without committing to a large dessert.
For the prettiest presentation, arrange the decorated pretzels in rows on a white serving platter. The orange, green, white, and purple colors create a striking Halloween display.
Four Adorable Designs From One Simple Recipe
One of the best features of these Halloween Chocolate-Covered Mini Pretzels is the variety.
You can create four completely different characters using the same basic dipping method.
Jack-o'-Lantern Pretzels
Bright orange candy melts transform each pretzel into a cheerful Halloween pumpkin. Black decorating icing adds triangle eyes, a nose, and a spooky smile.
Frankenstein and Bride Pretzels
Green candy melts create the perfect monster faces. Meanwhile, candy eyes, black sprinkles, and decorating icing give each character a playful personality.
For the bride, you can add white candy melt zigzags through the dark sprinkle hair.
Mummy Pretzels
White candy melts create a creamy coating, while thin white candy drizzles resemble overlapping mummy bandages.
Two candy eyes peek through the layers for an adorable finish.
Purple Monster Pretzels
Purple candy melts provide a colorful background for goofy monster faces. Candy eyes, black decorating icing, and bright Halloween sprinkles complete these playful treats.
Together, these four styles create an eye-catching assortment that makes even a simple Halloween gathering feel special.
Essential Ingredients and Decorating Tips
Choosing the Best Pretzels, Candy Melts, and Decorations
You only need a few basic supplies to make Halloween Chocolate-Covered Mini Pretzels, but choosing the right ingredients makes decorating much easier.
Mini Pretzels
Choose small, sturdy pretzels with an even shape. Traditional mini pretzel twists work well, although the open spaces may show through the coating. For smooth, round character faces like those in the reference photo, use mini pretzel rounds or snap-style pretzels with a similar profile.
Avoid broken or extra-thin pretzels because they may crumble during dipping.
Candy Melts
Candy melts create the colorful coating and eliminate the need for chocolate tempering.
You'll need four colors:
- Orange for pumpkins
- Green for Frankenstein characters
- White for mummies
- Purple for monsters
Candy melts usually set firmly at room temperature, making them convenient for parties and gift packaging.
Candy Eyes
Small edible candy eyes instantly give each character personality. Choose eyes that fit the size of your pretzels.
Black Decorating Icing
Black icing works well for pumpkin expressions, monster mouths, stitches, and other tiny facial features. Choose an icing that firms up after drying if you plan to package the treats.
Halloween Sprinkles
Orange, purple, black, green, and white sprinkles add extra color and texture.
Additionally, black jimmies make excellent Frankenstein hair, while green decorating candy creates pumpkin stems.
Helpful Tools and Easy Melting Techniques
You don't need expensive equipment to create these Halloween Chocolate-Covered Mini Pretzels.
However, a few simple tools can make the process faster and neater.
Start with microwave-safe bowls for melting the candy coatings. Use a separate bowl for each color to prevent unwanted mixing.
Next, line a large baking sheet with parchment paper. This creates a nonstick surface where your decorated pretzels can set.
A fork or dipping tool helps lift the pretzels from the melted coating. Meanwhile, a toothpick makes it easier to smooth uneven spots.
For detailed decorating, use small piping bags or resealable plastic bags with tiny corners snipped off.
When melting candy wafers, work slowly.
Heat the candy melts in short microwave intervals, stirring between each round. Excessive heat can make the coating thick, grainy, or difficult to work with.
If the candy becomes too thick, add a small amount of refined coconut oil or candy melt thinning aid.
However, avoid adding water because moisture can cause the coating to seize.
Finally, let the candy coating cool slightly before applying delicate decorations. This helps prevent the candy eyes and sprinkles from sliding out of place.
How to Create All Four Halloween Pretzel Designs
Making Jack-o'-Lanterns and Frankenstein Pretzels
Start your Halloween Chocolate-Covered Mini Pretzels with the orange and green characters.
Both designs use a simple candy coating, followed by facial decorations.
Jack-o'-Lantern Pretzels
First, melt the orange candy wafers according to the package instructions.
Dip each pretzel into the orange coating, turning gently until you cover the entire surface.
Next, lift the pretzel with a fork and tap off the excess coating.
Place it on parchment paper and let the coating firm up.
Once the orange coating has set, pipe two triangle-shaped eyes and a small triangle nose using black decorating icing.
Then, add a zigzag smile for a classic jack-o'-lantern expression.
For extra detail, pipe a tiny green stem at the top using green candy melts.
Frankenstein and Bride Pretzels
Next, melt the green candy wafers and dip another batch of pretzels.
Before the coating sets, gently press two candy eyes onto each pretzel.
Allow the coating to firm up.
Then, pipe black stitches, mouths, and small facial details.
For Frankenstein's hair, dip the top edge into black sprinkles while a little green coating remains tacky.
To create the bride, add white zigzag stripes through the dark hair using melted white candy.
The combination of green faces, dark hair, and googly eyes creates a playful Halloween look.
Making Mummy and Purple Monster Pretzels
Mummies and purple monsters complete your Halloween Chocolate-Covered Mini Pretzels assortment.
These designs add texture, personality, and plenty of color to the platter.
Mummy Pretzels
Begin by melting the white candy wafers until smooth.
Dip the pretzels and place them on parchment paper.
While the coating remains soft, add two candy eyes near the center of each pretzel.
Next, transfer a small amount of melted white candy to a piping bag.
Drizzle thin lines across the pretzels, moving in different directions to resemble mummy bandages.
Leave the eyes visible so the finished treats look like tiny wrapped mummy faces.
For a more realistic appearance, overlap several thin candy lines rather than creating one thick layer.
Purple Monster Pretzels
Melt the purple candy wafers and coat the remaining pretzels.
Place them on parchment paper, then quickly add two candy eyes.
While the coating remains slightly soft, scatter a few colorful Halloween sprinkles over the surface.
After the coating sets, use black decorating icing to add triangle noses, crooked mouths, or silly expressions.
For extra personality, add white candy melt smiles or tiny monster teeth.
You can even give each monster a different expression.
Finally, let all four designs set completely before transferring them to a serving platter.
Storage, Make-Ahead Tips, and Creative Halloween Serving Ideas
How to Keep Chocolate-Covered Pretzels Fresh and Crunchy
Proper storage helps Halloween Chocolate-Covered Mini Pretzels maintain their crunchy centers and smooth candy coatings.
Once the decorations have completely set, transfer the pretzels to an airtight container.
Place parchment paper between layers to protect the facial details.
Store the container in a cool, dry location away from direct sunlight.
Under good storage conditions, the treats should remain fresh for approximately one to two weeks, although the exact shelf life depends on the pretzels, coatings, and decorating icing.
For the best texture, serve them within the first week.
Refrigeration usually isn't necessary. In fact, cold storage may cause condensation to form when you return the pretzels to room temperature.
That moisture can affect the appearance of the coating and soften the pretzels.
However, if your kitchen stays particularly warm, you can refrigerate the treats in a tightly sealed container.
Before opening the container, allow it to return to room temperature. This helps reduce condensation.
You can also prepare the decorations ahead of your party.
For example, make the pretzels two or three days before Halloween, then arrange them on a platter just before serving.
This simple strategy saves time during busy party preparations.
Creative Ways to Serve and Gift Halloween Pretzels
Halloween Chocolate-Covered Mini Pretzels look especially impressive when you group the four designs together.
For a classic presentation, arrange the pumpkins, Frankenstein faces, mummies, and purple monsters in separate sections on a rectangular white platter.
The colorful characters create a fun pattern that instantly attracts attention.
Alternatively, mix the designs on a dessert board alongside other Halloween sweets.
You can pair them with popcorn, candy corn, chocolate candies, and seasonal cookies.
For individual party favors, place several pretzels into small clear treat bags.
Then, tie each bag with orange, black, or purple ribbon.
However, make sure every decoration has fully hardened before packaging. Otherwise, delicate facial details may smear.
Another creative option involves setting up a Halloween pretzel decorating station.
Prepare bowls of melted candy, candy eyes, sprinkles, and decorating icing.
Then, let guests create their own monster faces.
For younger children, adults should handle the hot melted candy while kids add the decorations after it cools to a safe temperature.
Additionally, you can customize the colors to match different Halloween themes.
Use neon green for silly monsters, pale purple for friendly ghosts, or orange-and-black sprinkles for classic Halloween party treats.
With so many possibilities, these simple pretzels offer plenty of room for creativity.
Ingredients
Makes approximately 40 decorated mini pretzels
- 4 cups mini pretzels, preferably round or sturdy mini twists (approximately 40 pieces)
- 1 cup orange candy melts (approximately 6 ounces)
- 1 cup green candy melts (approximately 6 ounces)
- 1 cup white candy melts (approximately 6 ounces)
- 1 cup purple candy melts (approximately 6 ounces)
- 80 small edible candy eyes
- 2 tablespoons black decorating icing
- 2 tablespoons assorted Halloween sprinkles
- 1 tablespoon black chocolate sprinkles or jimmies
- 1 tablespoon extra white candy melts, for monster smiles and bride hair
- 1 teaspoon refined coconut oil, optional, for thinning thick candy melts
Instructions
1. Prepare your workspace. Line two large baking sheets with parchment paper. Divide the mini pretzels into four groups of approximately 10 each.
2. Melt the candy coatings. Place the orange, green, white, and purple candy melts in separate microwave-safe bowls. Heat each color in 20–30-second intervals, stirring until smooth. Add a little coconut oil if needed.
3. Make the pumpkins. Dip 10 pretzels into the melted orange candy. Transfer them to parchment paper. Once the coating sets, use black icing to pipe triangle eyes, noses, and jack-o'-lantern smiles. Add tiny green stems if desired.
4. Create Frankenstein faces. Dip 10 pretzels into green candy melts. Add candy eyes while the coating remains soft. Press black sprinkles along the top for hair. Once firm, add stitched mouths and facial details with black icing.
5. Decorate the bride pretzels. Turn some of the green monsters into brides by piping white zigzag lines through their black sprinkle hair.
6. Make the mummies. Dip 10 pretzels into white candy melts. Add candy eyes, then drizzle additional melted white candy across the surface to create overlapping mummy bandages.
7. Make the purple monsters. Dip the final 10 pretzels into purple candy melts. Add candy eyes and Halloween sprinkles. Once the coating firms, decorate with black icing and optional white candy melt smiles.
8. Let the treats set. Leave all decorated pretzels on parchment paper for approximately 20 minutes, or until the candy coating hardens completely. Allow decorating icing extra drying time according to its package directions.
9. Serve or store. Arrange the finished pretzels on a Halloween serving platter or transfer them carefully to an airtight container.
Recipe timing and yield
| Detail | Amount |
|---|---|
| Prep Time | 25 minutes |
| Cook Time | 0 minutes |
| Setting Time | 20 minutes |
| Total Time | 45 minutes |
| Servings | About 40 pretzels |
| Difficulty | Easy |
| Method | No-bake |
Frequently Asked Questions
1. Can I make Halloween Chocolate-Covered Mini Pretzels ahead of time?
Yes! You can prepare Halloween Chocolate-Covered Mini Pretzels several days before your celebration. Store them in an airtight container in a cool, dry place. For the freshest flavor and crunch, make them within a week of serving. Additionally, place parchment paper between layers to protect the decorations.
2. Can I use regular chocolate instead of candy melts?
Yes, although regular chocolate requires slightly different handling. White chocolate works well with oil-based candy colors, while milk or dark chocolate creates a more traditional chocolate flavor. However, avoid water-based food coloring because it can cause chocolate to seize. Candy melts remain the easiest option when you want bright Halloween colors.
3. Why is my candy coating too thick for dipping?
Candy melts may become thick because of overheating, age, or moisture exposure. First, try stirring the mixture thoroughly. Then, add a small amount of refined coconut oil or candy melt thinning aid if necessary. Avoid adding water or milk. Additionally, heat the coating gently to maintain a smooth consistency.
4. How do I keep the candy eyes from falling off?
Add candy eyes while the coating remains soft enough to hold them in place. If the candy has already hardened, attach the eyes with a tiny dot of freshly melted candy coating. Then, let the coating set completely before moving or packaging the pretzels.
5. Can kids help decorate these Halloween pretzels?
Absolutely! Children can have fun adding candy eyes, colorful sprinkles, and silly monster expressions. However, adults should melt the candy wafers and supervise dipping because the coating can become hot. For younger children, prepare coated pretzels in advance and let them decorate once the coating reaches a safe temperature.
Conclusion
Halloween Chocolate-Covered Mini Pretzels are an easy, colorful, and delicious way to celebrate the spooky season. With four creative designs, you can transform simple mini pretzels into festive jack-o'-lanterns, Frankenstein characters, wrapped mummies, and cheerful purple monsters.
The combination of crunchy pretzels and smooth candy coating makes these treats especially satisfying. Meanwhile, the no-bake preparation keeps the recipe simple enough for beginners and fun enough for families.
Whether you're filling Halloween treat bags, arranging a party dessert platter, or enjoying a creative afternoon with the kids, these decorated pretzels bring plenty of Halloween charm to the table.
Best of all, you can prepare them ahead of time, customize the faces, and create an assortment that looks almost too cute to eat.
Leave a Reply